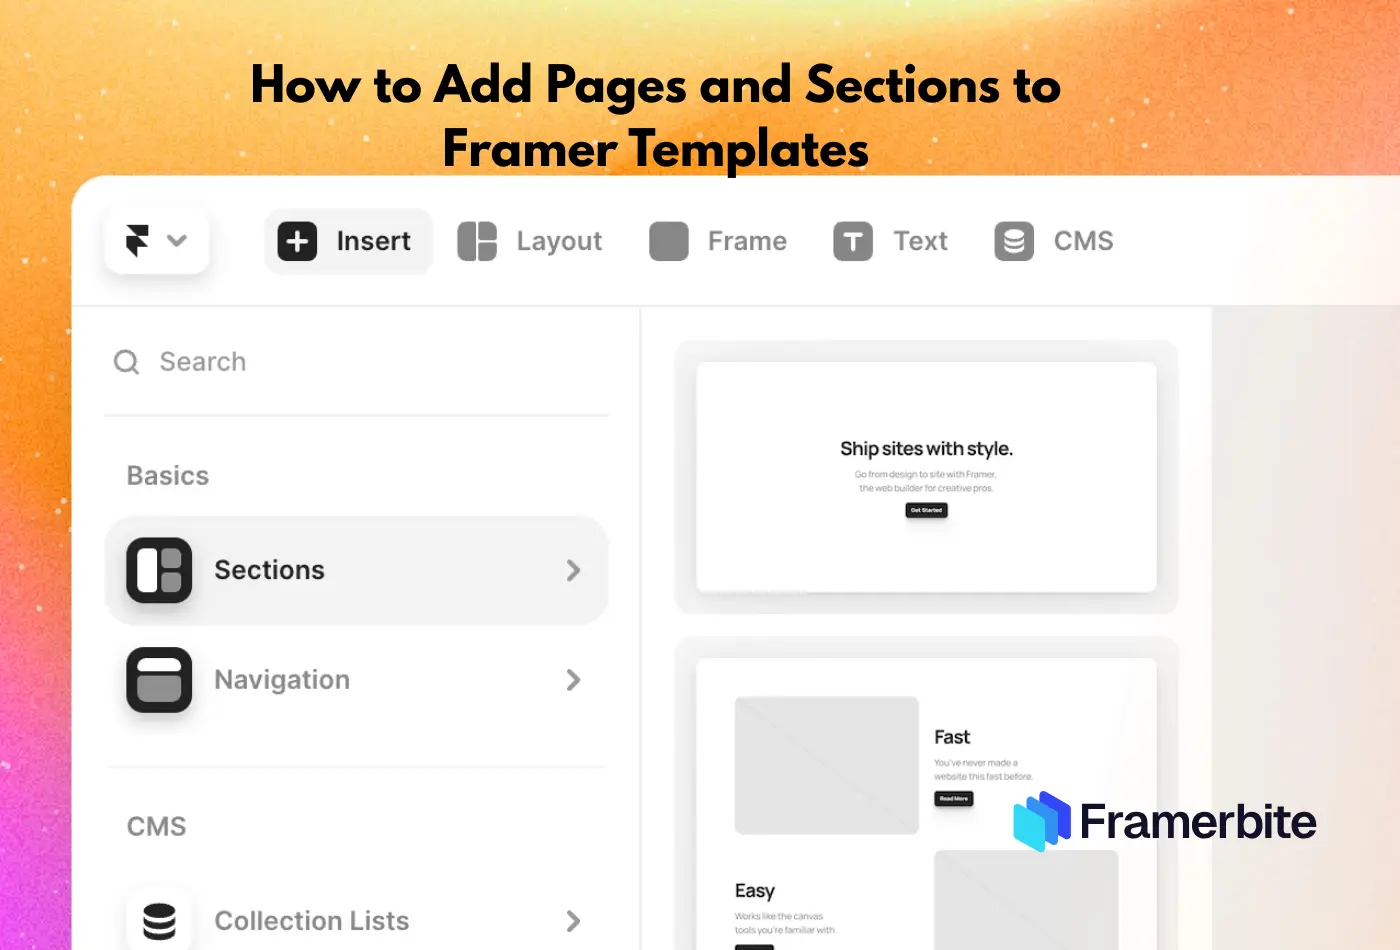
How to Add Pages and Sections to Framer Templates
Last Updated on:
Author:
Framerbite
Framerbite
Framer has become the most popular tool for designers and creators who want a website quickly without having to write code. It is easy to create professional-looking websites with a drag-and-drop interface and pre-built templates from website builders makes it even easier, but sometimes, just a template simply won't satisfy. In fact, creating your own site means adding completely new pages and sections.
With the help of this guide, you will finally learn everything to know about how to modify the Framer template you are working with by adding pages, creating engaging sections. After that, as everyone who reads this book will find out, you are able to take a model and make it unique.
Understanding of Framer Templates
Before you start customizing, it is important to understand the first thing what Framer templates are. Framer templates are pre-made website designs consisting of pages and headers, images such as slideshows or carousels, buttons, etc. You can use these for getting your own website off to a quick start without having to build everything from scratch.
Framer pages are individual screens or website pages like Home, About, Services, Contact, and Framer sections are smaller content blocks within a page, such as hero areas, testimonial grids, or feature lists.
Preparing to Customize Your Template
After you have prepared your template, do not rush to add more pages and sections; it will save you time later. Customization becomes much smoother when you understand how your Framer template works and have a plan in place.
1. Duplicate Your Template
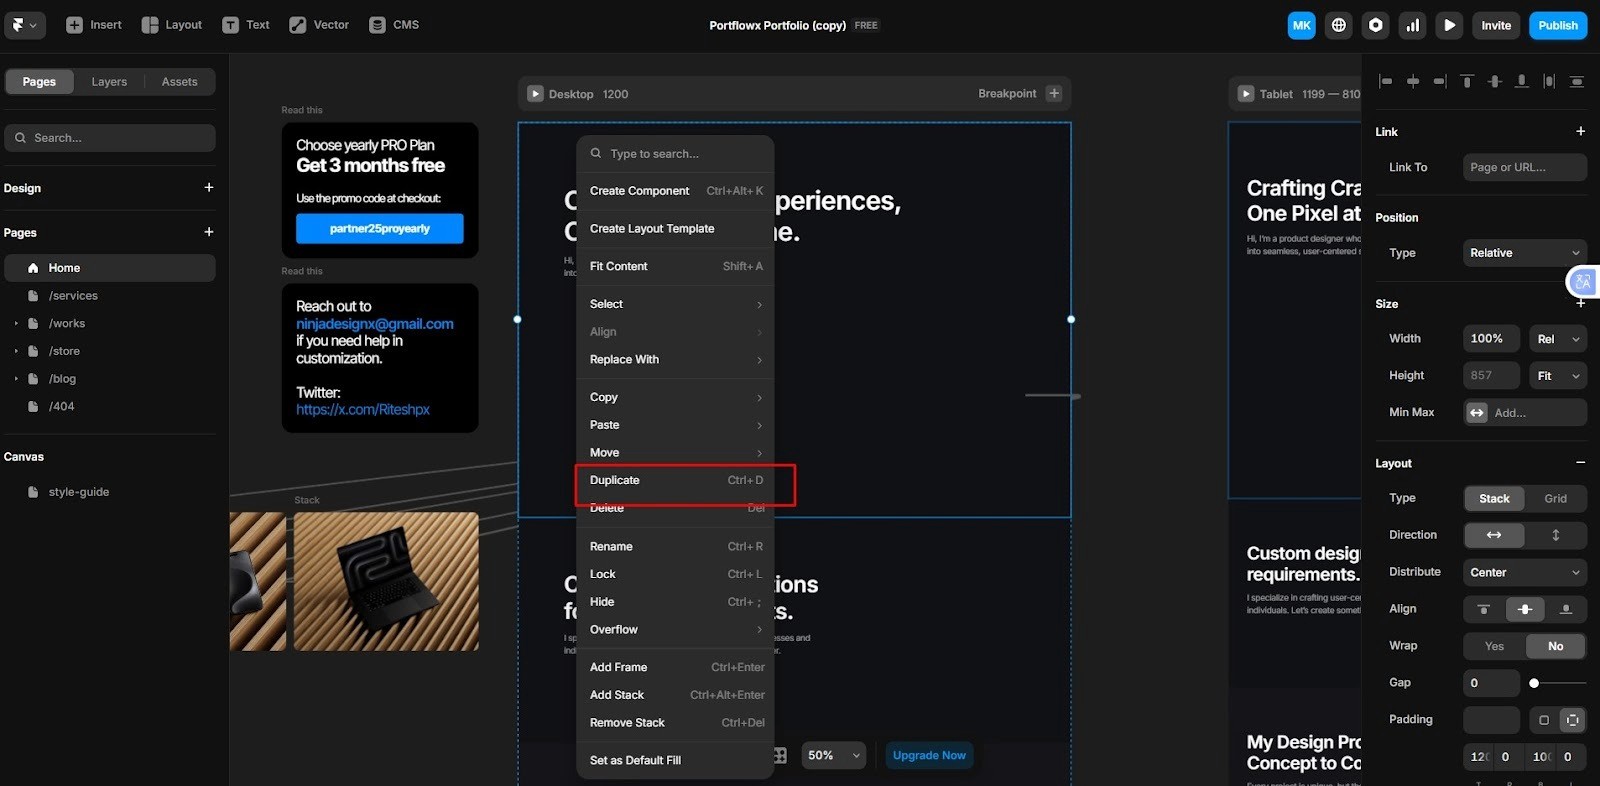
Before starting any major editing work, make sure you duplicate the original template. That way, at least there is one clean backup when things go wrong.
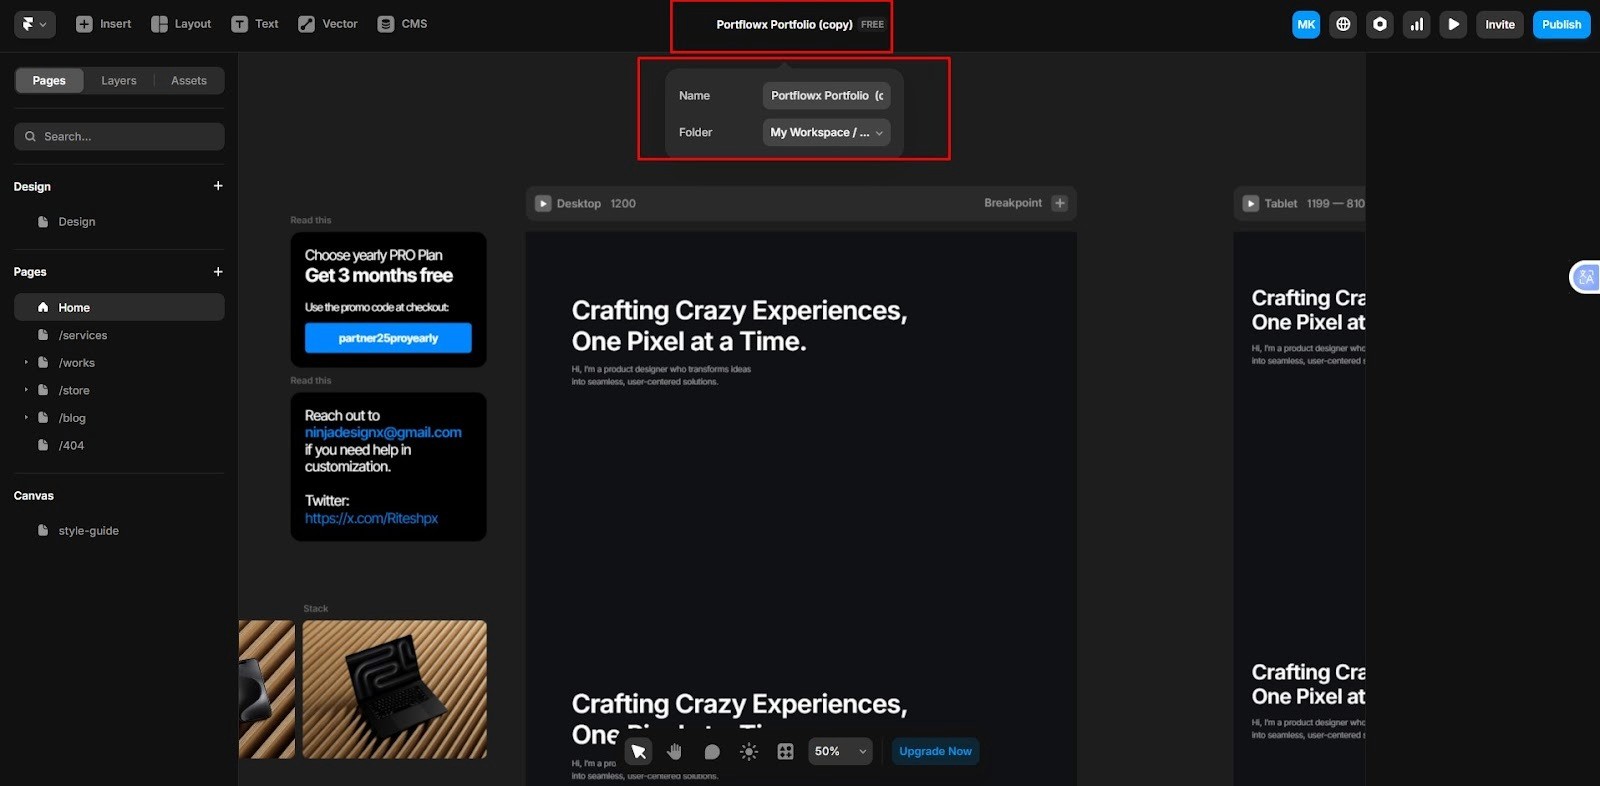
Go to your dashboard, click on the template, and select Duplicate.
Rename the copy
You can refer back to the original design or reapply sections if you accidentally change them.
2. Familiarize Yourself with the Layers Panel
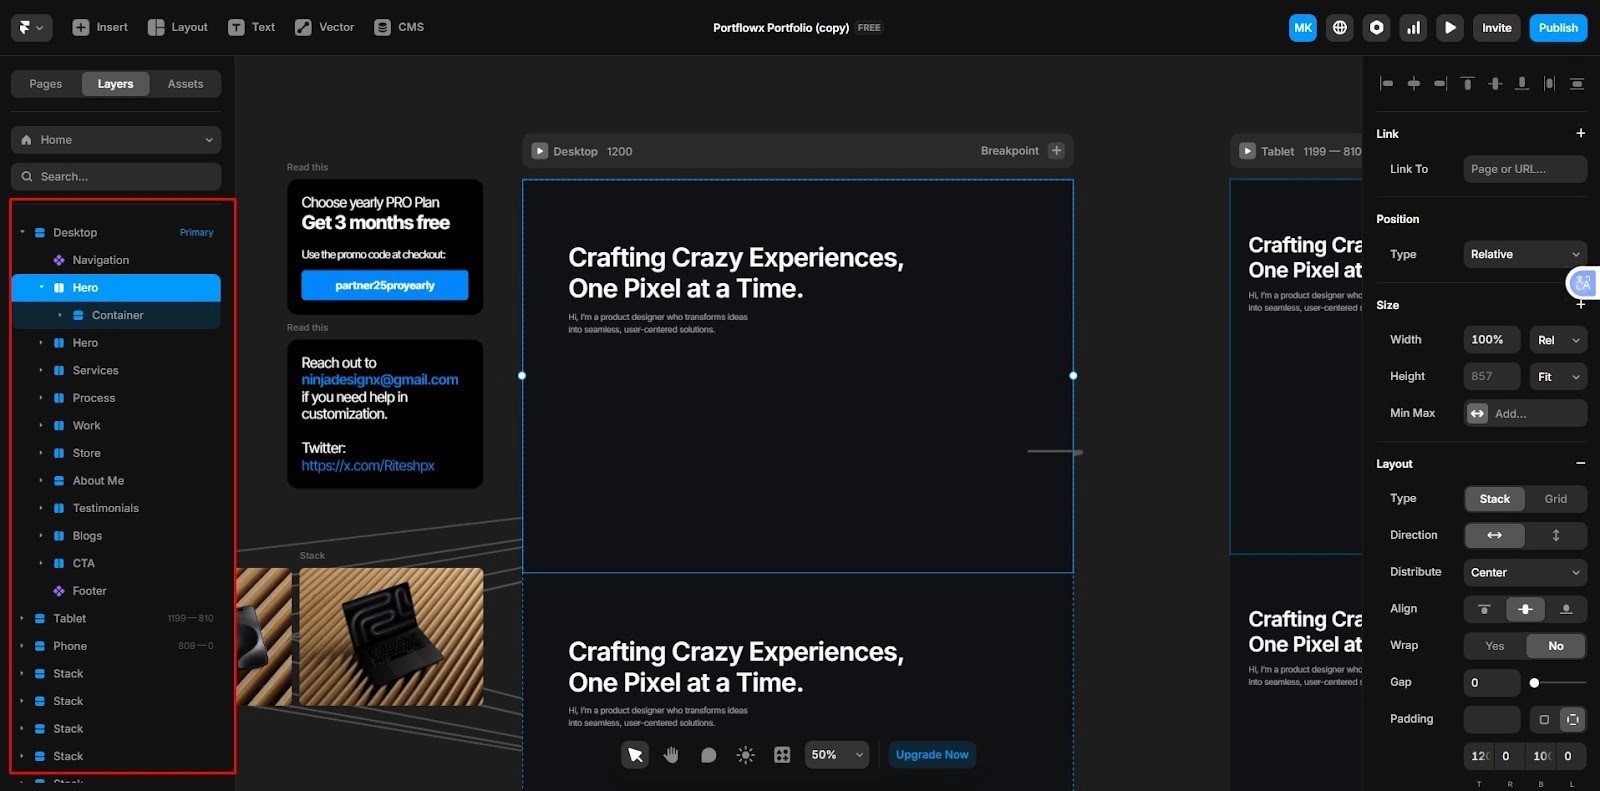
Framer organizes every part of your design, text, images, buttons, and sections into layers. That’s a bit like putting one thing on top of another a stacking pattern.
On Framer's left side is this panel.
The panel shows how each of your canvas objects fits into the webpage structure.
It keeps your workspace tidy and avoids accidental changes.
Layers become easy to use once you're familiar with them.
3. Plan Your Website Structure
Before you make design changes, check out the site's overall architecture. First of all, be sure to spend time getting to know this stand template like it was your own, before you make any changes. Click through all its pages. See from different angles what mechanisms do and make a note of what you have to work with: the color palette, typography, and layout style.
Therefore, it is essential to ensure that the overall aesthetic is kept while customizing menus.
List the main pages you’ll need like Home, About, Services, Contact, Blog).
Then, outline the sections for each page like hero banners, testimonials, pricing, or FAQ.
Having a clear plan makes the customization process organized and helps you keep your content consistent across all pages.
You can sketch it on paper or use Framer’s page tree to visualize how everything connects.
Adding a New Page in Framer
Adding a new page is one of the most useful steps that a person can take when making a template; it is equivalent to adding new chapters to an already written book. Below is a clear, friendly step-by-step guide, plus extra hints that you should not be unaware of.
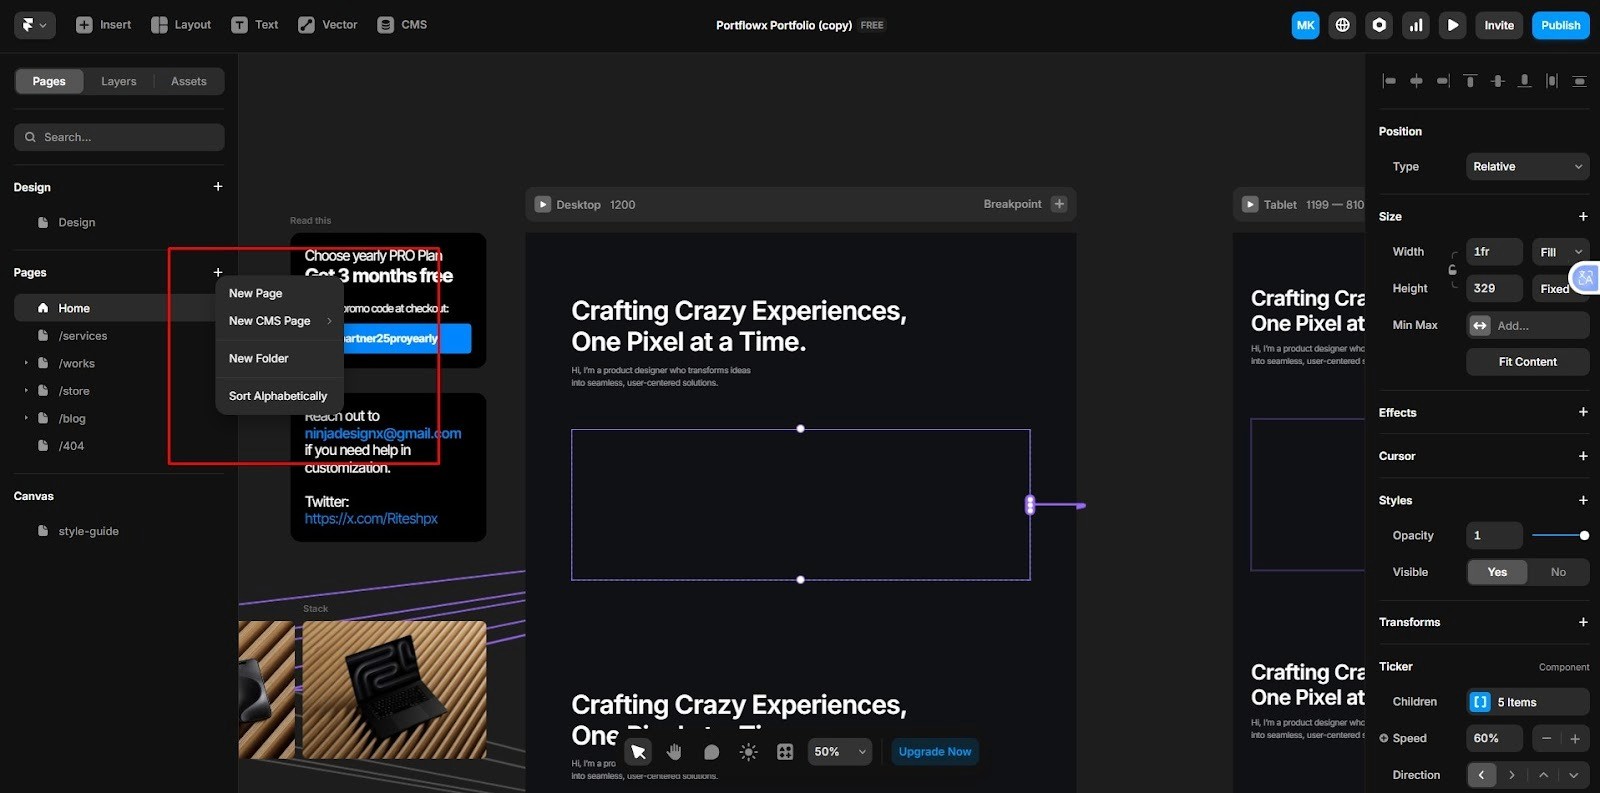
Open the Pages panel
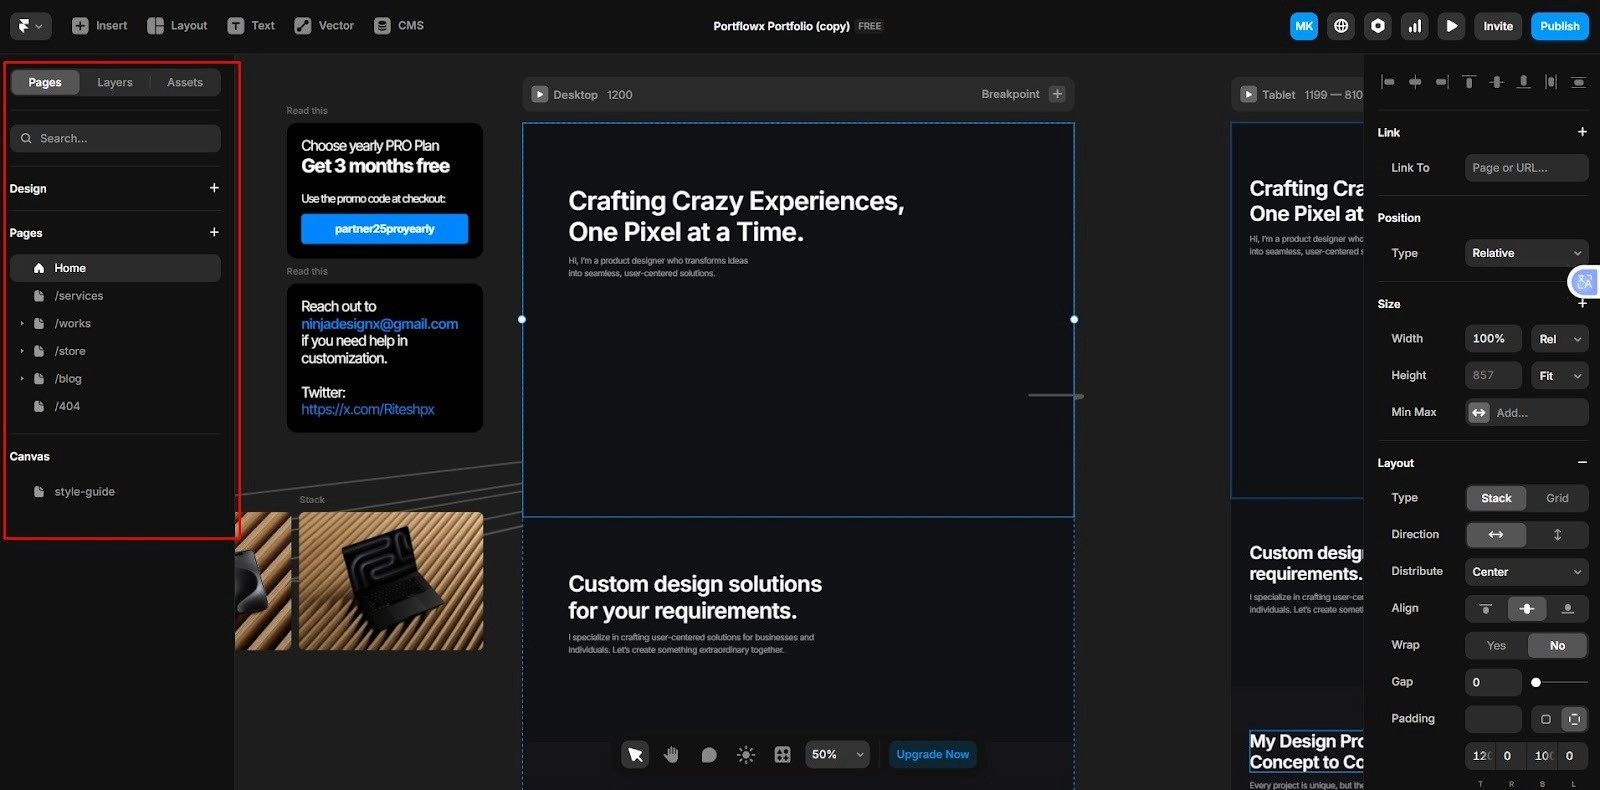
In the Framer editor, find the Pages or Page Tree panel, usually on the left sidebar. This shows every page in your project and the site hierarchy.
Create the page

Click Add Page to create a brand-new blank page or, to reuse layout and components, right-click an existing page and select Duplicate copies sections, components, and layout great for service/portfolio pages that share structure.
Rename the page
Double-click the new page’s name in the Pages panel and rename it to something meaningful like service, blog, or portfolio. Use short, clear names; they help your team and search engines.
Set the page URL/Slug
Open the page settings, click the gear icon or the page and look for URL/SEO settings. Edit the slug to a simple, readable URL like/services,/portfolio/blog. Avoid spaces and long strings.
Place the page in the navigation hierarchy
Drag the page inside the Pages panel to set where it appears in the site structure. If you want it as a dropdown item, nest it under another page. If it should be main menu item, make it a top-level page.
Add the page to your site navigation
Open your header/navigation component and then:
Use the built-in menu editor to add the new page; or
Link a menu item to the page by selecting the link and choosing the page from the link dropdown.
Test menu behavior in Preview to ensure links and dropdowns work.
Sections are the building blocks of every page in Framer. They help you organize your content visually, guide visitors through information smoothly, and make your design look clean and professional. Whether you’re adding a hero banner, testimonials, or a contact form, sections make it easy to structure your website clearly.
How to Add a Sections in Framer Template?
Open page
In the Pages panel, click on the page where you want to add a new section for example, Home, Services, or About.
Scroll to the desired position
On the canvas, move to the part of the page where you’d like the new section to appear. You can add it between existing sections or at the bottom of the page.
Add a new section
Click the “+” icon or choose “Add Section” from the top toolbar. You’ll see a variety of prebuilt section types like hero, features, testimonials, pricing, FAQ, or contact. Pick one that fits your goal or, if you want full control, start with a blank section.
Duplicate an existing section (optional)
If your page already has a layout you like, simply duplicate that section. This is great when you want consistent design and spacing across multiple parts of your site.
Customize the content
Replace the default text with your own copy. Update images, icons, and buttons to match your content and branding. You can drag and drop components, change background colors, and adjust spacing to create your own layout style.
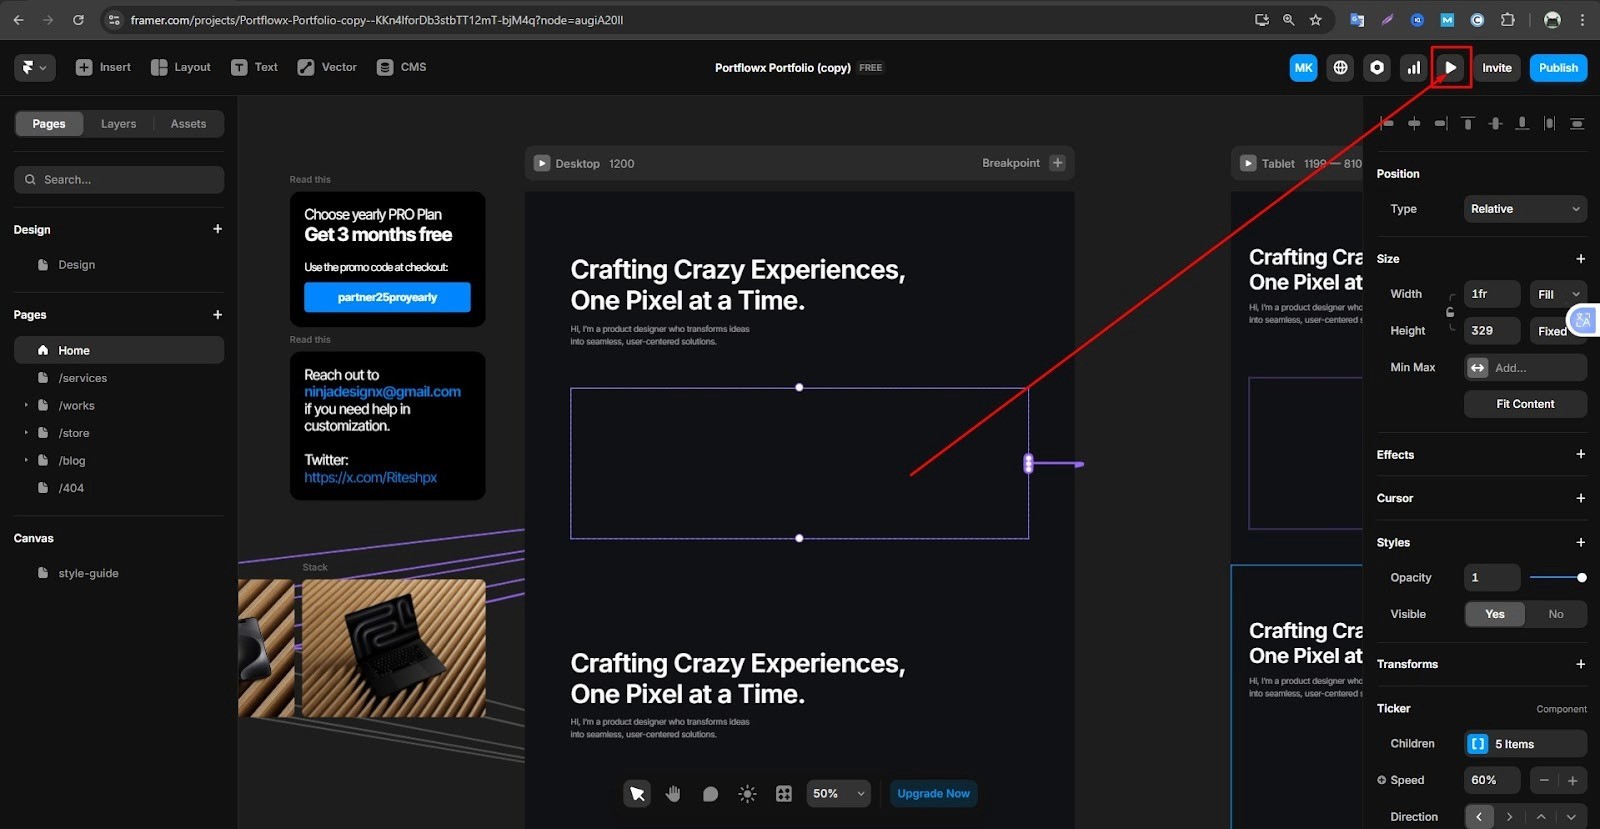
Preview your changes
Use the Preview button to check how your new section looks on desktop and mobile. Make small layout adjustments if anything feels too tight or unbalanced.
Best Practices for Add a Section
Keep consistent spacing
Use equal padding and margin between sections. This gives your website a cleaner, more professional appearance and improves readability.
Focus on purpose
Each section should have a reason to exist for example, introducing your business, explaining a feature, sharing customer testimonials, or prompting users to take action.
Don’t overload the page
Adding too many sections can overwhelm visitors. It’s better to focus on a few well-designed sections that tell your story clearly and guide users toward the next step.
Match your visual style
Stick to your site’s overall color palette, typography, and button styles so that every section feels part of the same brand.
Using Pre-Built Components for Sections
Framer comes with a large library of pre-built components that make designing pages faster and easier. These components are ready-made design blocks, you just drag, drop, and customize them. They’re perfect for beginners who want a professional look without starting from scratch.
Using pre-built components not only saves time but also helps you maintain a consistent layout and visual style across your website.
Popular Pre-Built Section Types
1. Hero Sections
These are the attention-grabbing banners that sit at the top of most pages. A hero section usually includes a headline that clearly explains what your page is about, Subtext or a short description for more context, a call-to-action button (CTA) that encourages visitors to take the next step, and optional background images or gradients for visual impact
Hero sections set the tone for your page, so make sure your message and visuals work together.
2. Feature Grids
Feature grids are used to highlight your product’s key features, services, or benefits. They often appear as clean, symmetrical layouts with icons or images. Great for SaaS websites, agencies, and portfolios, helps visitors quickly scan and understand what you offer. You can adjust the number of columns or add animation effects for a modern look
3. Testimonial Sections
Nothing builds trust like real feedback from customers. Framer’s testimonial components are pre-styled with text blocks, profile images, and rating icons. Showcase positive reviews or case studies, add real customer names and photos for authenticity, customize colors, typography, and spacing to match your brand.
4. Footer Sections
Footers are the finishing touch of your page. Framer includes several footer layouts designed to hold: contact details address, phone, or email, social media links, quick navigation to other pages, copyright text or legal disclaimers. A consistent footer helps visitors navigate and adds a professional touch to your site.
Linking Pages and Navigation
Once you’ve added your pages and sections, the next step is to connect everything together. Good navigation helps visitors move smoothly through your site from your homepage to your services, contact form, or blog without confusion. In Framer, linking pages is quick and visual, making it simple even for beginners.
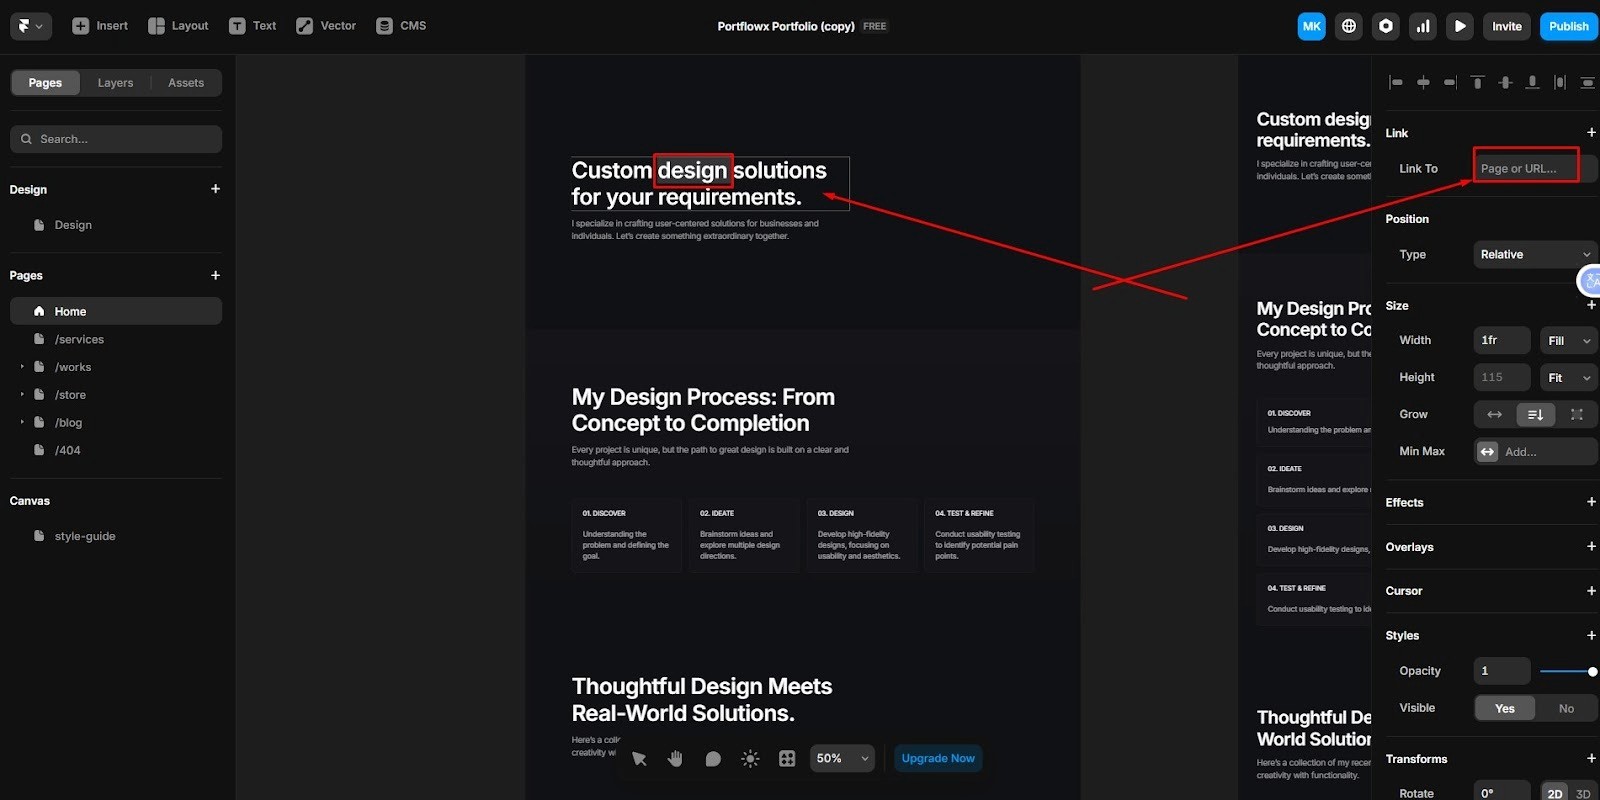
Select the button, text, or menu item
Click on the element you want to turn into a link. This could be a button, navigation item, image, or even a text block. You’ll see options appear in the right-hand properties panel or interactions panel.
Open the Interactions panel
In the right sidebar, look for the Interactions tab represented by a lightning bolt icon. Click Add Interaction and then Link to Page. From the drop down menu, choose the page you want to link to (for example, Home, Services, Contact). Framer will automatically handle the routing when you publish the site.
Use anchor links for same-page navigation
If you want to jump to a specific section on the same page like “Learn More” scrolling down to your About section, use anchor links. Select the section you want to link to, open the right sidebar, and assign it an ID name, for example, about or contact. Then, on your button or link, choose Link to Anchor and type in the same ID. This creates smooth scrolling between sections and improves user experience, especially for single-page layouts.
Add navigation links to your site header or footer
Open your navigation bar component and select each menu item, and use the same ''Link to Page'' option to connect it to your site’s main pages. You can also create drop down menus by nesting pages in the Pages panel, which Framer automatically turns into drop downs in your navigation.
Test your links before publishing
Click the Preview button on top right corner and navigate through your site as a visitor would. Test every button, menu item, and in-page link, and make sure all internal and external links work properly and lead to the right place.
Tips for Linking Pages and Navigation
Keep navigation simple: Limit your main menu to 5–7 items for clarity.
Use descriptive labels: Instead of ''More,'' use meaningful labels like ''Our Work'' or ''Contact Us.''
Check mobile menus: Open your site in mobile view and ensure your hamburger menu and drop downs work smoothly.
Highlight active pages: Use visual cues like bold text or underline so users know which page they’re currently on.
Preview often: Framer’s preview mode is the easiest way to spot broken links before your site goes live.
Styling Your New Pages and Sections
Consistency in design is one of the most important parts of building a professional-looking website. Even the best layouts can feel messy if fonts, colors, or spacing are inconsistent. And, Framer makes it easy to style your new pages and sections while keeping everything uniform across your site.
Here’s how to maintain a clean, cohesive design that matches your brand and feels visually balanced.
Fonts
Typography plays a big role in how your website feels. Stick to the template fonts unless you have specific brand guidelines. Templates are usually designed with complementary font pairs that already look balanced together.
If you do switch fonts, use Framer’s Font Settings to apply your new font sitewide, this ensures the same typeface is used everywhere. Use clear hierarchy: Headings (H1, H2) for structure, body text for readability, and buttons or captions for emphasis. Limit your site to 2–3 fonts total, usually one for headings and one for body text, to avoid visual clutter.
Colors
Colors set the mood of your site and help reinforce your brand identity. Use your brand colors for key elements like headings, buttons, and links. Keep neutral tones like white, gray, beige, or black for backgrounds to help content stand out.
Maintain high contrast between text and background for easy readability. Use consistent color codes, for example, the same shade of blue for all CTAs, to keep things visually unified. Framer allows you to define color variables. Once you set your brand colors globally, you can reuse them anywhere with just one click.
Spacing
Good spacing makes your layout breathe and improves user experience. Use consistent padding and margins between sections, images, and text. Avoid overcrowding white space is your friend. It helps users focus on important information. Check your alignment: Make sure elements line up neatly on the grid.
Framer’s Auto Layout feature helps maintain even spacing automatically as you add or remove elements. If a page feels ''off,'' it’s often a spacing issue. Compare it with your template’s original layout to match proportions.
Responsive Design
With more people browsing on mobile devices, responsive design isn’t optional, it’s essential. Switch between desktop, tablet, and mobile views in Framer to see how each page adapts.
Adjust font sizes, image proportions, and spacing for smaller screens.
Make sure buttons are large enough to tap easily on mobile. Preview scrolling and animation effects to ensure smooth performance. Keep testing on actual devices whenever possible. What looks great on your desktop might feel too tight on a phone screen.
Using Global Styles for Consistency
Framer’s Global Styles feature is a huge time-saver for site-wide consistency. Go to design settings - global styles to define your website’s fonts, color palette, and spacing rules.
Once applied, every new section or page you add will automatically follow those global styles. If you later decide to update your main font or brand color, you can change it once in Global Styles, and Framer will update it across your entire website instantly. Use Global Styles early in your project; it saves hours of manual editing later on.
Preview and Publish
Almost you are ready for publish. After customizing your pages, styling your sections, and connecting your links, it’s time to see how everything looks in action. Previewing your website helps you spot small issues before they go live, and publishing in Framer is as simple as one click.
Once everything looks perfect, it’s time to go live. Click the Publish button in the top-right corner. Framer will ask you to choose a domain: either a free Framer subdomain or your own custom domain. After publishing, Framer automatically hosts your site and generates a live link you can share immediately. If you make updates later, just click Publish again. Framer will instantly sync your latest edits to the live site, no complicated steps required.
Common Mistakes to Avoid
Customizing a Framer template is exciting, but it’s easy to make small mistakes that can affect your website’s look and performance. The good news is that most of these issues are simple to avoid once you know what to watch out for.
Here are some of the most common mistakes beginners make and how you can steer clear of them:
Adding Too Many Sections
It’s tempting to keep adding new sections to show more information, but less is often more in web design. Too many sections can make your pages feel cluttered and overwhelming. Visitors may lose interest if they have to scroll endlessly to find what they need.
Instead, focus on quality over quantity. Each section should have a clear purpose like, showcasing a product, sharing testimonials, or prompting users to take action. Review your page layout from a visitor’s perspective. If a section doesn’t add value or support your message, remove it.
Forgetting to Link New Pages
This is one of the most common beginner mistakes. After creating new pages, make sure they’re linked properly in your header menu, buttons, and footer navigation. An un-linked page means users can’t access it, even if it’s beautifully designed, and always double-check your links in Preview Mode before publishing.
Use consistent link naming so visitors easily recognize where each button leads. For example, always use ''Contact Us'' instead of mixing “Contact” and “Get in Touch.”
Inconsistent Styling
Consistency is what makes your website look professional and trustworthy. Using different fonts, colors, or spacing across pages can make your site appear disorganized. Stick to your chosen global fonts, color palette, and spacing system throughout the site.
If you want to experiment with design, test it on one section first before applying it sitewide. Use Framer’s global styles to apply uniform design settings across all pages. This saves time and keeps your site visually consistent.
Ignoring Mobile Optimization
Many visitors will view your site on their phones, so never skip mobile design checks. A layout that looks perfect on desktop might be cramped or broken on mobile. Always test your pages in Framer’s mobile view and make adjustments to font size, image scaling, and button placement. Ensure clickable elements have enough spacing so users can tap easily.
Not Previewing Before Publishing
Skipping the final preview can lead to missed errors. You might overlook broken links, uneven spacing, or typos. Use Framer’s Preview Mode to walk through your site page by page before click on ''Publish''. Check all buttons, menus, and animations to confirm they behave correctly. Preview your site on multiple browsers like Chrome, Safari, or Edge to make sure it looks consistent everywhere.
FAQs
1. Can I add unlimited pages in Framer templates?
Yes, Framer allows you to add as many pages as needed for your website.
2. How do I duplicate a section without affecting the original?
Use the duplicate option in the layers panel to create a copy that you can edit independently.
3. Can I add custom code to a section?
Absolutely. Framer supports custom code for advanced functionality, though most users can achieve great results without it.
4 How do I rearrange sections on a page?
Drag and drop sections within the layers panel to reorder them easily.
5. Will my pages work on mobile devices automatically?
Framer templates are responsive, but always preview and adjust elements for the best mobile experience.
6. Can I revert to the original template if needed?
Yes, always duplicate the template before making changes so you have a backup.
Conclusion
Adding pages and sections to Framer templates is simple and intuitive once you understand the basics. By following this guide, you can expand your website with new pages, organize content effectively using sections, and maintain a consistent design across fonts, colors, and spacing, creating a professional and user-friendly experience for visitors.
Framer makes customization fast and flexible, so you don’t need to be a coding expert to build a beautiful, functional website. Start experimenting today and transform your Framer template into a fully customized website that reflects your brand, vision, and style.
Ready to build your dream website? Start customizing your Framer template today and bring your brand to life!
Framer has become the most popular tool for designers and creators who want a website quickly without having to write code. It is easy to create professional-looking websites with a drag-and-drop interface and pre-built templates from website builders makes it even easier, but sometimes, just a template simply won't satisfy. In fact, creating your own site means adding completely new pages and sections.
With the help of this guide, you will finally learn everything to know about how to modify the Framer template you are working with by adding pages, creating engaging sections. After that, as everyone who reads this book will find out, you are able to take a model and make it unique.
Understanding of Framer Templates
Before you start customizing, it is important to understand the first thing what Framer templates are. Framer templates are pre-made website designs consisting of pages and headers, images such as slideshows or carousels, buttons, etc. You can use these for getting your own website off to a quick start without having to build everything from scratch.
Framer pages are individual screens or website pages like Home, About, Services, Contact, and Framer sections are smaller content blocks within a page, such as hero areas, testimonial grids, or feature lists.
Preparing to Customize Your Template
After you have prepared your template, do not rush to add more pages and sections; it will save you time later. Customization becomes much smoother when you understand how your Framer template works and have a plan in place.
1. Duplicate Your Template
Before starting any major editing work, make sure you duplicate the original template. That way, at least there is one clean backup when things go wrong.
Go to your dashboard, click on the template, and select Duplicate.
Rename the copy
You can refer back to the original design or reapply sections if you accidentally change them.
2. Familiarize Yourself with the Layers Panel
Framer organizes every part of your design, text, images, buttons, and sections into layers. That’s a bit like putting one thing on top of another a stacking pattern.
On Framer's left side is this panel.
The panel shows how each of your canvas objects fits into the webpage structure.
It keeps your workspace tidy and avoids accidental changes.
Layers become easy to use once you're familiar with them.
3. Plan Your Website Structure
Before you make design changes, check out the site's overall architecture. First of all, be sure to spend time getting to know this stand template like it was your own, before you make any changes. Click through all its pages. See from different angles what mechanisms do and make a note of what you have to work with: the color palette, typography, and layout style.
Therefore, it is essential to ensure that the overall aesthetic is kept while customizing menus.
List the main pages you’ll need like Home, About, Services, Contact, Blog).
Then, outline the sections for each page like hero banners, testimonials, pricing, or FAQ.
Having a clear plan makes the customization process organized and helps you keep your content consistent across all pages.
You can sketch it on paper or use Framer’s page tree to visualize how everything connects.
Adding a New Page in Framer
Adding a new page is one of the most useful steps that a person can take when making a template; it is equivalent to adding new chapters to an already written book. Below is a clear, friendly step-by-step guide, plus extra hints that you should not be unaware of.
Open the Pages panel
In the Framer editor, find the Pages or Page Tree panel, usually on the left sidebar. This shows every page in your project and the site hierarchy.
Create the page
Click Add Page to create a brand-new blank page or, to reuse layout and components, right-click an existing page and select Duplicate copies sections, components, and layout great for service/portfolio pages that share structure.
Rename the page
Double-click the new page’s name in the Pages panel and rename it to something meaningful like service, blog, or portfolio. Use short, clear names; they help your team and search engines.
Set the page URL/Slug
Open the page settings, click the gear icon or the page and look for URL/SEO settings. Edit the slug to a simple, readable URL like/services,/portfolio/blog. Avoid spaces and long strings.
Place the page in the navigation hierarchy
Drag the page inside the Pages panel to set where it appears in the site structure. If you want it as a dropdown item, nest it under another page. If it should be main menu item, make it a top-level page.
Add the page to your site navigation
Open your header/navigation component and then:
Use the built-in menu editor to add the new page; or
Link a menu item to the page by selecting the link and choosing the page from the link dropdown.
Test menu behavior in Preview to ensure links and dropdowns work.
Sections are the building blocks of every page in Framer. They help you organize your content visually, guide visitors through information smoothly, and make your design look clean and professional. Whether you’re adding a hero banner, testimonials, or a contact form, sections make it easy to structure your website clearly.
How to Add a Sections in Framer Template?
Open page
In the Pages panel, click on the page where you want to add a new section for example, Home, Services, or About.
Scroll to the desired position
On the canvas, move to the part of the page where you’d like the new section to appear. You can add it between existing sections or at the bottom of the page.
Add a new section
Click the “+” icon or choose “Add Section” from the top toolbar. You’ll see a variety of prebuilt section types like hero, features, testimonials, pricing, FAQ, or contact. Pick one that fits your goal or, if you want full control, start with a blank section.
Duplicate an existing section (optional)
If your page already has a layout you like, simply duplicate that section. This is great when you want consistent design and spacing across multiple parts of your site.
Customize the content
Replace the default text with your own copy. Update images, icons, and buttons to match your content and branding. You can drag and drop components, change background colors, and adjust spacing to create your own layout style.
Preview your changes
Use the Preview button to check how your new section looks on desktop and mobile. Make small layout adjustments if anything feels too tight or unbalanced.
Best Practices for Add a Section
Keep consistent spacing
Use equal padding and margin between sections. This gives your website a cleaner, more professional appearance and improves readability.
Focus on purpose
Each section should have a reason to exist for example, introducing your business, explaining a feature, sharing customer testimonials, or prompting users to take action.
Don’t overload the page
Adding too many sections can overwhelm visitors. It’s better to focus on a few well-designed sections that tell your story clearly and guide users toward the next step.
Match your visual style
Stick to your site’s overall color palette, typography, and button styles so that every section feels part of the same brand.
Using Pre-Built Components for Sections
Framer comes with a large library of pre-built components that make designing pages faster and easier. These components are ready-made design blocks, you just drag, drop, and customize them. They’re perfect for beginners who want a professional look without starting from scratch.
Using pre-built components not only saves time but also helps you maintain a consistent layout and visual style across your website.
Popular Pre-Built Section Types
1. Hero Sections
These are the attention-grabbing banners that sit at the top of most pages. A hero section usually includes a headline that clearly explains what your page is about, Subtext or a short description for more context, a call-to-action button (CTA) that encourages visitors to take the next step, and optional background images or gradients for visual impact
Hero sections set the tone for your page, so make sure your message and visuals work together.
2. Feature Grids
Feature grids are used to highlight your product’s key features, services, or benefits. They often appear as clean, symmetrical layouts with icons or images. Great for SaaS websites, agencies, and portfolios, helps visitors quickly scan and understand what you offer. You can adjust the number of columns or add animation effects for a modern look
3. Testimonial Sections
Nothing builds trust like real feedback from customers. Framer’s testimonial components are pre-styled with text blocks, profile images, and rating icons. Showcase positive reviews or case studies, add real customer names and photos for authenticity, customize colors, typography, and spacing to match your brand.
4. Footer Sections
Footers are the finishing touch of your page. Framer includes several footer layouts designed to hold: contact details address, phone, or email, social media links, quick navigation to other pages, copyright text or legal disclaimers. A consistent footer helps visitors navigate and adds a professional touch to your site.
Linking Pages and Navigation
Once you’ve added your pages and sections, the next step is to connect everything together. Good navigation helps visitors move smoothly through your site from your homepage to your services, contact form, or blog without confusion. In Framer, linking pages is quick and visual, making it simple even for beginners.
Select the button, text, or menu item
Click on the element you want to turn into a link. This could be a button, navigation item, image, or even a text block. You’ll see options appear in the right-hand properties panel or interactions panel.
Open the Interactions panel
In the right sidebar, look for the Interactions tab represented by a lightning bolt icon. Click Add Interaction and then Link to Page. From the drop down menu, choose the page you want to link to (for example, Home, Services, Contact). Framer will automatically handle the routing when you publish the site.
Use anchor links for same-page navigation
If you want to jump to a specific section on the same page like “Learn More” scrolling down to your About section, use anchor links. Select the section you want to link to, open the right sidebar, and assign it an ID name, for example, about or contact. Then, on your button or link, choose Link to Anchor and type in the same ID. This creates smooth scrolling between sections and improves user experience, especially for single-page layouts.
Add navigation links to your site header or footer
Open your navigation bar component and select each menu item, and use the same ''Link to Page'' option to connect it to your site’s main pages. You can also create drop down menus by nesting pages in the Pages panel, which Framer automatically turns into drop downs in your navigation.
Test your links before publishing
Click the Preview button on top right corner and navigate through your site as a visitor would. Test every button, menu item, and in-page link, and make sure all internal and external links work properly and lead to the right place.
Tips for Linking Pages and Navigation
Keep navigation simple: Limit your main menu to 5–7 items for clarity.
Use descriptive labels: Instead of ''More,'' use meaningful labels like ''Our Work'' or ''Contact Us.''
Check mobile menus: Open your site in mobile view and ensure your hamburger menu and drop downs work smoothly.
Highlight active pages: Use visual cues like bold text or underline so users know which page they’re currently on.
Preview often: Framer’s preview mode is the easiest way to spot broken links before your site goes live.
Styling Your New Pages and Sections
Consistency in design is one of the most important parts of building a professional-looking website. Even the best layouts can feel messy if fonts, colors, or spacing are inconsistent. And, Framer makes it easy to style your new pages and sections while keeping everything uniform across your site.
Here’s how to maintain a clean, cohesive design that matches your brand and feels visually balanced.
Fonts
Typography plays a big role in how your website feels. Stick to the template fonts unless you have specific brand guidelines. Templates are usually designed with complementary font pairs that already look balanced together.
If you do switch fonts, use Framer’s Font Settings to apply your new font sitewide, this ensures the same typeface is used everywhere. Use clear hierarchy: Headings (H1, H2) for structure, body text for readability, and buttons or captions for emphasis. Limit your site to 2–3 fonts total, usually one for headings and one for body text, to avoid visual clutter.
Colors
Colors set the mood of your site and help reinforce your brand identity. Use your brand colors for key elements like headings, buttons, and links. Keep neutral tones like white, gray, beige, or black for backgrounds to help content stand out.
Maintain high contrast between text and background for easy readability. Use consistent color codes, for example, the same shade of blue for all CTAs, to keep things visually unified. Framer allows you to define color variables. Once you set your brand colors globally, you can reuse them anywhere with just one click.
Spacing
Good spacing makes your layout breathe and improves user experience. Use consistent padding and margins between sections, images, and text. Avoid overcrowding white space is your friend. It helps users focus on important information. Check your alignment: Make sure elements line up neatly on the grid.
Framer’s Auto Layout feature helps maintain even spacing automatically as you add or remove elements. If a page feels ''off,'' it’s often a spacing issue. Compare it with your template’s original layout to match proportions.
Responsive Design
With more people browsing on mobile devices, responsive design isn’t optional, it’s essential. Switch between desktop, tablet, and mobile views in Framer to see how each page adapts.
Adjust font sizes, image proportions, and spacing for smaller screens.
Make sure buttons are large enough to tap easily on mobile. Preview scrolling and animation effects to ensure smooth performance. Keep testing on actual devices whenever possible. What looks great on your desktop might feel too tight on a phone screen.
Using Global Styles for Consistency
Framer’s Global Styles feature is a huge time-saver for site-wide consistency. Go to design settings - global styles to define your website’s fonts, color palette, and spacing rules.
Once applied, every new section or page you add will automatically follow those global styles. If you later decide to update your main font or brand color, you can change it once in Global Styles, and Framer will update it across your entire website instantly. Use Global Styles early in your project; it saves hours of manual editing later on.
Preview and Publish
Almost you are ready for publish. After customizing your pages, styling your sections, and connecting your links, it’s time to see how everything looks in action. Previewing your website helps you spot small issues before they go live, and publishing in Framer is as simple as one click.
Once everything looks perfect, it’s time to go live. Click the Publish button in the top-right corner. Framer will ask you to choose a domain: either a free Framer subdomain or your own custom domain. After publishing, Framer automatically hosts your site and generates a live link you can share immediately. If you make updates later, just click Publish again. Framer will instantly sync your latest edits to the live site, no complicated steps required.
Common Mistakes to Avoid
Customizing a Framer template is exciting, but it’s easy to make small mistakes that can affect your website’s look and performance. The good news is that most of these issues are simple to avoid once you know what to watch out for.
Here are some of the most common mistakes beginners make and how you can steer clear of them:
Adding Too Many Sections
It’s tempting to keep adding new sections to show more information, but less is often more in web design. Too many sections can make your pages feel cluttered and overwhelming. Visitors may lose interest if they have to scroll endlessly to find what they need.
Instead, focus on quality over quantity. Each section should have a clear purpose like, showcasing a product, sharing testimonials, or prompting users to take action. Review your page layout from a visitor’s perspective. If a section doesn’t add value or support your message, remove it.
Forgetting to Link New Pages
This is one of the most common beginner mistakes. After creating new pages, make sure they’re linked properly in your header menu, buttons, and footer navigation. An un-linked page means users can’t access it, even if it’s beautifully designed, and always double-check your links in Preview Mode before publishing.
Use consistent link naming so visitors easily recognize where each button leads. For example, always use ''Contact Us'' instead of mixing “Contact” and “Get in Touch.”
Inconsistent Styling
Consistency is what makes your website look professional and trustworthy. Using different fonts, colors, or spacing across pages can make your site appear disorganized. Stick to your chosen global fonts, color palette, and spacing system throughout the site.
If you want to experiment with design, test it on one section first before applying it sitewide. Use Framer’s global styles to apply uniform design settings across all pages. This saves time and keeps your site visually consistent.
Ignoring Mobile Optimization
Many visitors will view your site on their phones, so never skip mobile design checks. A layout that looks perfect on desktop might be cramped or broken on mobile. Always test your pages in Framer’s mobile view and make adjustments to font size, image scaling, and button placement. Ensure clickable elements have enough spacing so users can tap easily.
Not Previewing Before Publishing
Skipping the final preview can lead to missed errors. You might overlook broken links, uneven spacing, or typos. Use Framer’s Preview Mode to walk through your site page by page before click on ''Publish''. Check all buttons, menus, and animations to confirm they behave correctly. Preview your site on multiple browsers like Chrome, Safari, or Edge to make sure it looks consistent everywhere.
FAQs
1. Can I add unlimited pages in Framer templates?
Yes, Framer allows you to add as many pages as needed for your website.
2. How do I duplicate a section without affecting the original?
Use the duplicate option in the layers panel to create a copy that you can edit independently.
3. Can I add custom code to a section?
Absolutely. Framer supports custom code for advanced functionality, though most users can achieve great results without it.
4 How do I rearrange sections on a page?
Drag and drop sections within the layers panel to reorder them easily.
5. Will my pages work on mobile devices automatically?
Framer templates are responsive, but always preview and adjust elements for the best mobile experience.
6. Can I revert to the original template if needed?
Yes, always duplicate the template before making changes so you have a backup.
Conclusion
Adding pages and sections to Framer templates is simple and intuitive once you understand the basics. By following this guide, you can expand your website with new pages, organize content effectively using sections, and maintain a consistent design across fonts, colors, and spacing, creating a professional and user-friendly experience for visitors.
Framer makes customization fast and flexible, so you don’t need to be a coding expert to build a beautiful, functional website. Start experimenting today and transform your Framer template into a fully customized website that reflects your brand, vision, and style.
Ready to build your dream website? Start customizing your Framer template today and bring your brand to life!


Read more articles

Feb 28, 2026
Best Framer Templates with Parallax Scrolling
Feb 28, 2026
Best Framer Templates with Parallax Scrolling

Feb 22, 2026
Framer Canvas: Design Without Limits
Feb 22, 2026
Framer Canvas: Design Without Limits

Feb 19, 2026
Best Companies Specializing in Framer Website Templates in 2026
Feb 19, 2026
Best Companies Specializing in Framer Website Templates in 2026
Find perfect template for your website & get 50% discount coupon

Templates
Copyright © 2026 FramerBite, A Part of Creetfy LLC. All Rights Reserved
Follow us on Twitter
Find perfect template for your website & get 50% discount coupon
Templates
Copyright © 2026 FramerBite, A Part of Creetfy LLC. All Rights Reserved
Follow us on Twitter
Find perfect template for your website & get 50% discount coupon
Templates
Copyright © 2026 FramerBite, A Part of Creetfy LLC. All Rights Reserved
Follow us on Twitter
Find perfect template for your website & get 50% discount coupon
Templates
Copyright © 2026 FramerBite, A Part of Creetfy LLC. All Rights Reserved
Follow us on Twitter