Framer Canvas: Design Without Limits
Last Updated on:
Author:
Framerbite
Framerbite

When you open Framer, you’ll see a blank, infinite white space called the Framer canvas. This is your workspace for interactive design and responsive web design. But for many beginners, this blank canvas can feel overwhelming. Where do you start? How do you navigate efficiently? What are the hidden features that professionals use to work faster? And how do you harness the Canvas's full power without getting lost in infinite space?
Whether you’re building a simple landing page or a complex website, the canvas lets you turn ideas into real designs. For beginners, the infinite space can feel overwhelming, but once you understand it, it becomes your most powerful tool.
What Is the Framer Canvas?
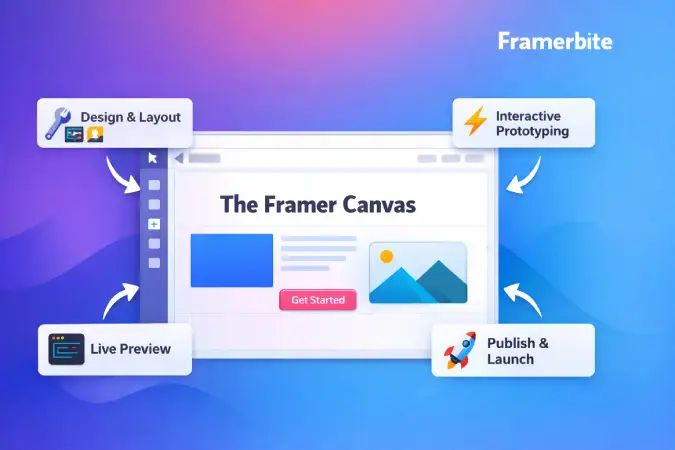
The Framer canvas is more than a blank area. It’s a flexible design tool that lets you create, arrange, and prototype websites without limits. Unlike traditional art boards, it allows you to explore multiple ideas at once and see how they work in real time.
Design Space
Unlike traditional design tools with fixed art board sizes, the Framer canvas is infinite, you can design in any direction without boundaries. This might seem like a small detail, but it fundamentally changes how you approach design.
Traditional Design Tools | Framer Canvas |
|---|---|
Fixed artboards representing different screen sizes | Unlimited space in all directions |
Need to create new artboards for variations | Design multiple pages, components, and variations |
Limited space for exploration | Explore ideas without constraint |
Difficult to see relationships between pages | Visualize site structure spatially and Zoom from 1% to 10,000% smoothly |
Real-Time Preview Integration
What you see on the canvas is what you get, almost literally. Framer canvas shows a real-time preview of how your design will behave when published. Key Differences:
Other tools: Design mode vs prototype mode vs live site (three separate views)
Framer: Canvas design is the actual website (one view, live immediately)
This means animations, interactions, breakpoints, and dynamic content all work directly on the canvas as you design. No switching between modes, no disconnection between design and reality.
Canvas vs Artboards
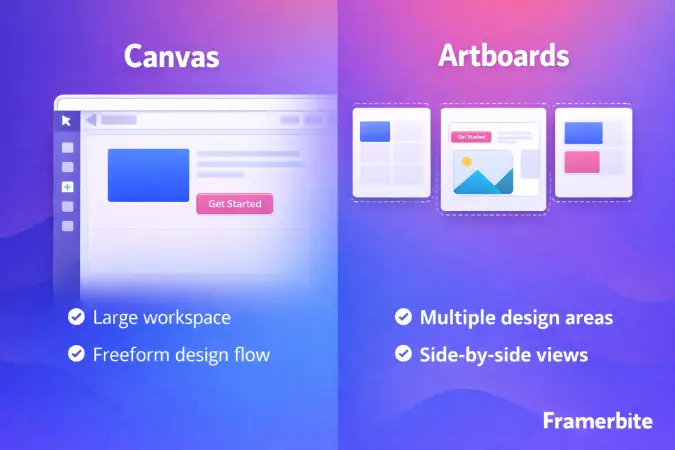
Framer canvas differs from traditional artboard-based tools like Figma or Sketch. This approach changes the way you design and prototype.
Feature | Artboard (Figma, Sketch, Adobe XD) | Framer Canvas |
|---|---|---|
Design Space | Fixed-size artboards for each screen | Infinite space, design in any direction |
Navigation | Separate screens must be linked for prototyping | Continuous Canvas with live scrolling and navigation |
Interactions | Prototype mode needed for animations and links | Interactions, animations, and links work directly on Canvas |
Responsiveness | Manual adjustments for each artboard | Frames can use breakpoints for responsive layouts |
Reusability | Elements often duplicated across artboards | Components and frames are reusable and update automatically |
Preview | Separate design and prototype views | Real-time preview on the same Canvas |
Best for | Mockups, isolated screens | Actual websites, interactive prototypes, responsive design |
Navigating the Framer Canvas
Efficient navigation is fundamental to productive design work. Learn these techniques to move around quickly.
Quick Zoom to Elements: Press Z to temporarily activate zoom mode, click where you want to zoom in. This is faster than using zoom controls for focused work.
Zoom to Selection: Select elements and press Cmd/Ctrl + 2 to zoom perfectly to their bounds. Essential when working on specific components.
Navigate Between Pages: Use the Pages panel on the left to quickly jump between different pages in your project. Click a page name to center it on the canvas.
Frame Selection: Press Cmd/Ctrl + A to select all frames on the current view level. Useful for operations affecting multiple pages.
Bird's Eye View: Zoom out far enough (Cmd/Ctrl + Minus several times) to see your entire project layout. This helps understand site structure and relationships between pages.
Working with Frames
Frames are the building blocks of your Framer design tool workflow. They allow you to organize pages, sections, and reusable components.
Creating Frames
Draw a Frame: Press F, click and drag
Insert Preset Frame: Press A, choose Desktop, Tablet, or Mobile
Wrap Elements in a Frame: Select Cmd/Ctrl + Opt/Alt + G
Frame Properties
Size: Fixed, auto, or responsive
Styles: Solid colors, gradients, images, videos, or blur
Layout: Freehand, Stack (vertical/horizontal), or Grid
Frame Types
Page Frames: Represent main pages like Home, About, or Product
Section Frames: Key sections like Hero, Features, Footer
Component Frames: Reusable elements such as Buttons, Cards, or Navigation bars
Canvas Tools and Features
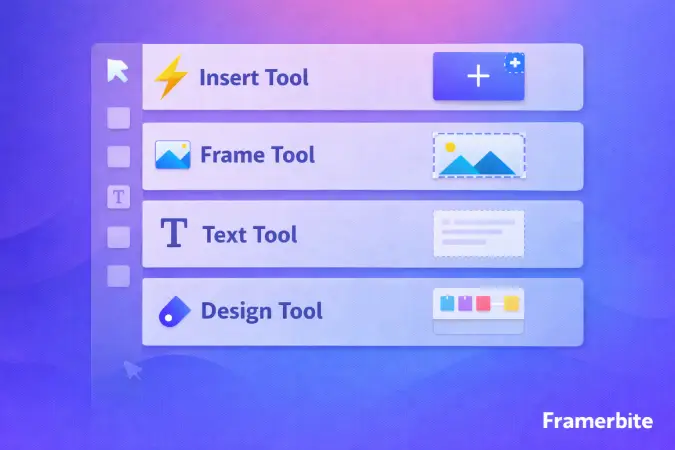
Framer canvas includes powerful tools for interactive design and component-based workflows.
Frame Tool (F) - Create containers for content
Shape Tools - Rectangle (R), Ellipse (O), Line (L)
Text Tool (T) - Add text boxes
Image Tool (Cmd/Ctrl + Shift + K) - Place images directly
Component Tool (Cmd/Ctrl + K) - Add pre-built Framer components
Advanced Canvas Features
Auto Layout (Stacks) - Flexible layouts that adjust automatically
Grid Layout - Two-dimensional alignment for complex designs
Effects & Filters - Shadows, blur, opacity, and blend modes
Transforms - Rotate, scale, skew, 3D effects
Scroll Areas - Make frames scrollable for long content
Canvas-Specific Interactions
Hover Effects: Design hover states directly on canvas.
Click Interactions: Create links and interactions.
Scroll Effects: Elements can respond to scroll position.
Professional Canvas Workflows
Professionals use the Canvas to work faster and maintain consistency by structuring layouts clearly and relying on reusable elements instead of redesigning from scratch.
Component-Based Design
Components allow designers to create an element once and reuse it across pages. Any update to the master component automatically applies everywhere. Variants are used to manage different states, such as button styles, card interactions, or responsive navigation.
Design System Organization
The Canvas acts as a central design system hub. Colors, typography, spacing rules, icons, and core components are kept in a dedicated, organized section for easy reference and consistent use.
Rapid Prototyping Workflow
Speed comes from duplication, keyboard shortcuts, and component reuse. Designers copy styles, duplicate frames, and use layout templates to build and iterate pages quickly.
Collaboration on Canvas
Teams collaborate in real time on the same canvas. Changes appear instantly, comments can be left on elements, and everyone stays aligned without version conflicts.
Effective Collaboration Practices
Clear frame naming, organized work areas, and comments keep teamwork efficient. Completed sections are locked to avoid accidental changes and protect finalized designs.
Common Canvas Mistakes and Solutions
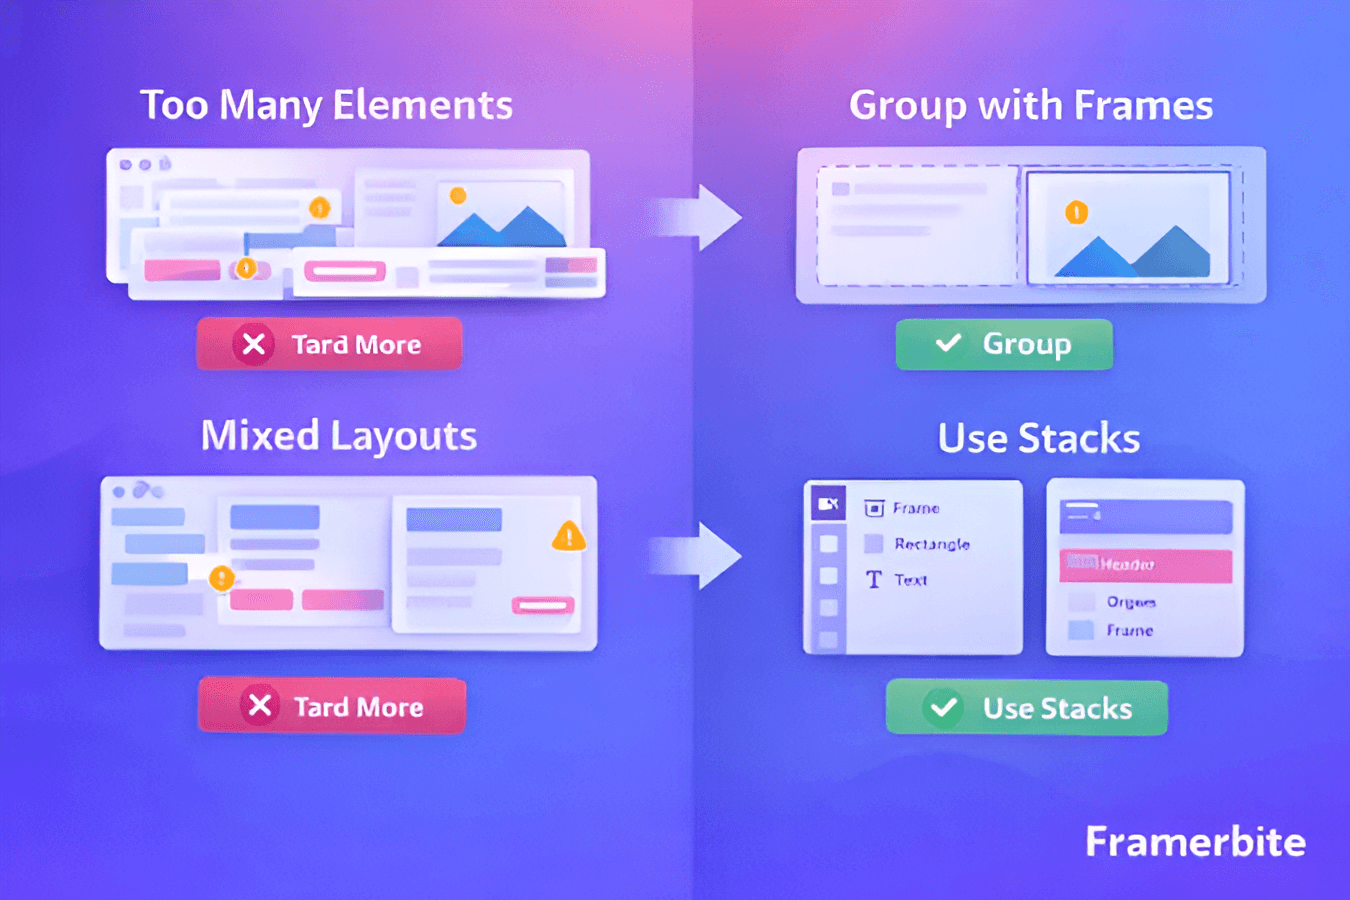
Beginners often struggle with infinite Canvas space and flexible layouts. Awareness of pitfalls helps maintain productivity. There are some common mistakes and solution points:
Getting lost in the Canvas - Use zoom-to-fit, organize pages, name frames clearly
Overlapping elements - Check hierarchy, use grids and outlines
Inconsistent spacing - Use Stack/Grid layouts, spacing tokens
Not using components - Identify patterns and create reusable elements early
Ignoring responsive design - Test all breakpoints regularly
Over-complicated layers - Keep hierarchy flat and manageable
Future of Framer Canvas
The Framer canvas is likely to become more than a design surface, it may evolve into an intelligent design environment that actively assists creators in building faster, smarter, and more adaptive experiences.
AI-Driven Design Intelligence
Future canvas workflows may be guided by Framer AI that suggests layouts, adjusts responsiveness automatically, and optimizes spacing based on content and screen context. Components could become predictive, with the canvas recommending the right variants or structures before designers even search for them.
Next-Generation Collaboration
Collaboration on the canvas could feel closer to live co-creation than shared editing. Teams may gain deeper real-time presence, stronger version control, and context-aware comments that stay connected to design intent, not just elements.
High-Performance Creative Scale
As projects grow more complex, canvas is expected to scale effortlessly. Faster rendering, smoother animations, and intelligent resource management may allow designers to work on large, content-heavy sites without performance trade-offs.
Expanded Creative Dimensions
The canvas may expand beyond traditional 2D layouts. Native 3D elements, timeline-based animation control, richer layout systems, and deeper code integration could allow designers to build highly interactive, app-like experiences without leaving the Canvas.
Final Words: Your Canvas, Your Possibilities
The Framer canvas is a flexible, powerful tool for creating interactive websites, prototypes, and responsive designs. By learning navigation, frames, components, and workflows, beginners can quickly become confident designers.
The Canvas is waiting. What will you create?
When you open Framer, you’ll see a blank, infinite white space called the Framer canvas. This is your workspace for interactive design and responsive web design. But for many beginners, this blank canvas can feel overwhelming. Where do you start? How do you navigate efficiently? What are the hidden features that professionals use to work faster? And how do you harness the Canvas's full power without getting lost in infinite space?
Whether you’re building a simple landing page or a complex website, the canvas lets you turn ideas into real designs. For beginners, the infinite space can feel overwhelming, but once you understand it, it becomes your most powerful tool.
What Is the Framer Canvas?
The Framer canvas is more than a blank area. It’s a flexible design tool that lets you create, arrange, and prototype websites without limits. Unlike traditional art boards, it allows you to explore multiple ideas at once and see how they work in real time.
Design Space
Unlike traditional design tools with fixed art board sizes, the Framer canvas is infinite, you can design in any direction without boundaries. This might seem like a small detail, but it fundamentally changes how you approach design.
Traditional Design Tools | Framer Canvas |
|---|---|
Fixed artboards representing different screen sizes | Unlimited space in all directions |
Need to create new artboards for variations | Design multiple pages, components, and variations |
Limited space for exploration | Explore ideas without constraint |
Difficult to see relationships between pages | Visualize site structure spatially and Zoom from 1% to 10,000% smoothly |
Real-Time Preview Integration
What you see on the canvas is what you get, almost literally. Framer canvas shows a real-time preview of how your design will behave when published. Key Differences:
Other tools: Design mode vs prototype mode vs live site (three separate views)
Framer: Canvas design is the actual website (one view, live immediately)
This means animations, interactions, breakpoints, and dynamic content all work directly on the canvas as you design. No switching between modes, no disconnection between design and reality.
Canvas vs Artboards
Framer canvas differs from traditional artboard-based tools like Figma or Sketch. This approach changes the way you design and prototype.
Feature | Artboard (Figma, Sketch, Adobe XD) | Framer Canvas |
|---|---|---|
Design Space | Fixed-size artboards for each screen | Infinite space, design in any direction |
Navigation | Separate screens must be linked for prototyping | Continuous Canvas with live scrolling and navigation |
Interactions | Prototype mode needed for animations and links | Interactions, animations, and links work directly on Canvas |
Responsiveness | Manual adjustments for each artboard | Frames can use breakpoints for responsive layouts |
Reusability | Elements often duplicated across artboards | Components and frames are reusable and update automatically |
Preview | Separate design and prototype views | Real-time preview on the same Canvas |
Best for | Mockups, isolated screens | Actual websites, interactive prototypes, responsive design |
Navigating the Framer Canvas
Efficient navigation is fundamental to productive design work. Learn these techniques to move around quickly.
Quick Zoom to Elements: Press Z to temporarily activate zoom mode, click where you want to zoom in. This is faster than using zoom controls for focused work.
Zoom to Selection: Select elements and press Cmd/Ctrl + 2 to zoom perfectly to their bounds. Essential when working on specific components.
Navigate Between Pages: Use the Pages panel on the left to quickly jump between different pages in your project. Click a page name to center it on the canvas.
Frame Selection: Press Cmd/Ctrl + A to select all frames on the current view level. Useful for operations affecting multiple pages.
Bird's Eye View: Zoom out far enough (Cmd/Ctrl + Minus several times) to see your entire project layout. This helps understand site structure and relationships between pages.
Working with Frames
Frames are the building blocks of your Framer design tool workflow. They allow you to organize pages, sections, and reusable components.
Creating Frames
Draw a Frame: Press F, click and drag
Insert Preset Frame: Press A, choose Desktop, Tablet, or Mobile
Wrap Elements in a Frame: Select Cmd/Ctrl + Opt/Alt + G
Frame Properties
Size: Fixed, auto, or responsive
Styles: Solid colors, gradients, images, videos, or blur
Layout: Freehand, Stack (vertical/horizontal), or Grid
Frame Types
Page Frames: Represent main pages like Home, About, or Product
Section Frames: Key sections like Hero, Features, Footer
Component Frames: Reusable elements such as Buttons, Cards, or Navigation bars
Canvas Tools and Features
Framer canvas includes powerful tools for interactive design and component-based workflows.
Frame Tool (F) - Create containers for content
Shape Tools - Rectangle (R), Ellipse (O), Line (L)
Text Tool (T) - Add text boxes
Image Tool (Cmd/Ctrl + Shift + K) - Place images directly
Component Tool (Cmd/Ctrl + K) - Add pre-built Framer components
Advanced Canvas Features
Auto Layout (Stacks) - Flexible layouts that adjust automatically
Grid Layout - Two-dimensional alignment for complex designs
Effects & Filters - Shadows, blur, opacity, and blend modes
Transforms - Rotate, scale, skew, 3D effects
Scroll Areas - Make frames scrollable for long content
Canvas-Specific Interactions
Hover Effects: Design hover states directly on canvas.
Click Interactions: Create links and interactions.
Scroll Effects: Elements can respond to scroll position.
Professional Canvas Workflows
Professionals use the Canvas to work faster and maintain consistency by structuring layouts clearly and relying on reusable elements instead of redesigning from scratch.
Component-Based Design
Components allow designers to create an element once and reuse it across pages. Any update to the master component automatically applies everywhere. Variants are used to manage different states, such as button styles, card interactions, or responsive navigation.
Design System Organization
The Canvas acts as a central design system hub. Colors, typography, spacing rules, icons, and core components are kept in a dedicated, organized section for easy reference and consistent use.
Rapid Prototyping Workflow
Speed comes from duplication, keyboard shortcuts, and component reuse. Designers copy styles, duplicate frames, and use layout templates to build and iterate pages quickly.
Collaboration on Canvas
Teams collaborate in real time on the same canvas. Changes appear instantly, comments can be left on elements, and everyone stays aligned without version conflicts.
Effective Collaboration Practices
Clear frame naming, organized work areas, and comments keep teamwork efficient. Completed sections are locked to avoid accidental changes and protect finalized designs.
Common Canvas Mistakes and Solutions
Beginners often struggle with infinite Canvas space and flexible layouts. Awareness of pitfalls helps maintain productivity. There are some common mistakes and solution points:
Getting lost in the Canvas - Use zoom-to-fit, organize pages, name frames clearly
Overlapping elements - Check hierarchy, use grids and outlines
Inconsistent spacing - Use Stack/Grid layouts, spacing tokens
Not using components - Identify patterns and create reusable elements early
Ignoring responsive design - Test all breakpoints regularly
Over-complicated layers - Keep hierarchy flat and manageable
Future of Framer Canvas
The Framer canvas is likely to become more than a design surface, it may evolve into an intelligent design environment that actively assists creators in building faster, smarter, and more adaptive experiences.
AI-Driven Design Intelligence
Future canvas workflows may be guided by Framer AI that suggests layouts, adjusts responsiveness automatically, and optimizes spacing based on content and screen context. Components could become predictive, with the canvas recommending the right variants or structures before designers even search for them.
Next-Generation Collaboration
Collaboration on the canvas could feel closer to live co-creation than shared editing. Teams may gain deeper real-time presence, stronger version control, and context-aware comments that stay connected to design intent, not just elements.
High-Performance Creative Scale
As projects grow more complex, canvas is expected to scale effortlessly. Faster rendering, smoother animations, and intelligent resource management may allow designers to work on large, content-heavy sites without performance trade-offs.
Expanded Creative Dimensions
The canvas may expand beyond traditional 2D layouts. Native 3D elements, timeline-based animation control, richer layout systems, and deeper code integration could allow designers to build highly interactive, app-like experiences without leaving the Canvas.
Final Words: Your Canvas, Your Possibilities
The Framer canvas is a flexible, powerful tool for creating interactive websites, prototypes, and responsive designs. By learning navigation, frames, components, and workflows, beginners can quickly become confident designers.
The Canvas is waiting. What will you create?


Read more articles

Feb 28, 2026
Best Framer Templates with Parallax Scrolling
Feb 28, 2026
Best Framer Templates with Parallax Scrolling
Feb 19, 2026
Best Companies Specializing in Framer Website Templates in 2026
Feb 19, 2026
Best Companies Specializing in Framer Website Templates in 2026

Feb 17, 2026
Framer Partner Program | Opportunities for Designers to Earn More, Get Clients, and Build Passive Income
Feb 17, 2026
Framer Partner Program | Opportunities for Designers to Earn More, Get Clients, and Build Passive Income
Find perfect template for your website & get 50% discount coupon

Templates
Copyright © 2026 FramerBite, A Part of Creetfy LLC. All Rights Reserved
Follow us on Twitter
Find perfect template for your website & get 50% discount coupon
Templates
Copyright © 2026 FramerBite, A Part of Creetfy LLC. All Rights Reserved
Follow us on Twitter
Find perfect template for your website & get 50% discount coupon
Templates
Copyright © 2026 FramerBite, A Part of Creetfy LLC. All Rights Reserved
Follow us on Twitter
Find perfect template for your website & get 50% discount coupon
Templates
Copyright © 2026 FramerBite, A Part of Creetfy LLC. All Rights Reserved
Follow us on Twitter