How to Add Video to Framer Template
Last Updated on:
Author:
Framerbite
Framerbite

Hey Designers, we’re the Framerbite team, and we know adding a video to your Framer website can feel a little confusing at the beginning. But don't worry, it's actually super easy, once you know where to click.
A video can make your site look more active and more fun, even if it's a short product clip, a looping background, or some simple animation. The process of adding a video in Framer, we will guide you through each step step-by-step, from uploading your file to using a video link, setting the size and quality of playback, and layout.
Just follow the instructions in the step-by-step, and by the time you finish, you'll be running a stunning video without any bugs for your Framer template, no configuration or programming needed.
What You’ll Need Before Starting,
Make sure you have:
A Framer project is open and editable
A video file, uploaded from your computer or hosted on a direct URL supporting video formats
Basic familiarity with Framer’s Insert Menu and the right-hand properties panel
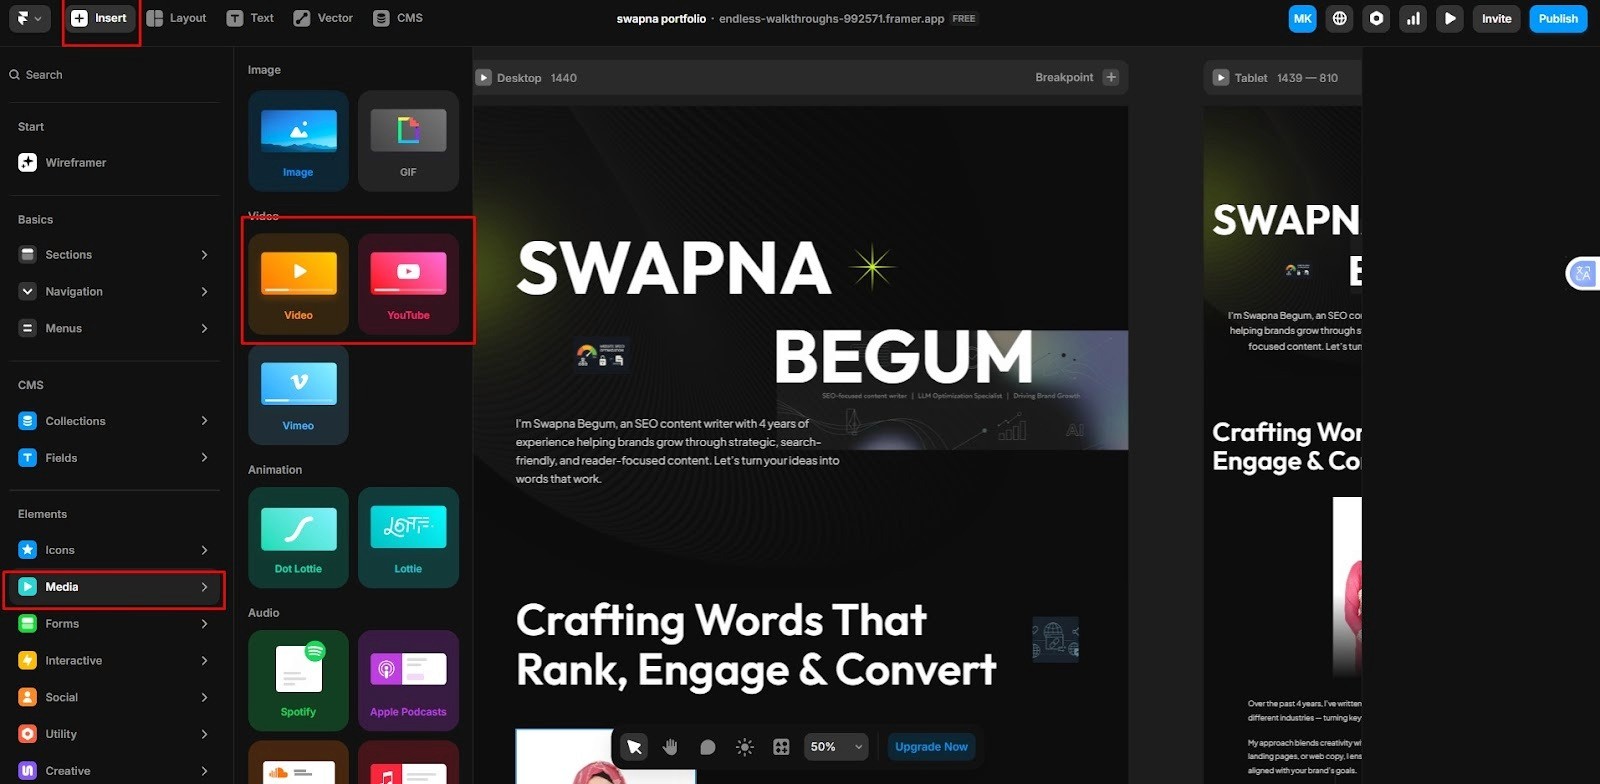
Step 1 - Open Canvas and Insert the Video Component
Adding videos to your Framer template is not necessarily as difficult as you might think. This guide will show you how to get the job done, along with installing video files and optimizing the user experience. Your videos will be displayed correctly while diverting people’s attention to their content. Still, the process engages your learners in high levels of concentration just as well or better than when they were asked to watch a moving picture.
Adding a video in Framer is simple with these steps:
Open your project in Framer.
Click Insert in the top-left corner.
Scroll down to the Media section and select Video.
Drag the Video component into your layout and place it wherever you want it under a heading, in a section, or as a background.
You can also drop it to scale or resize in video view, hold Shift + Option while resizing to maintain proportions, and center the video more easily.
Quick Tips:
You can also use videos as looping animated backgrounds; just put those video clips out of sight (behind other elements) and then check the loop in the Video panel.
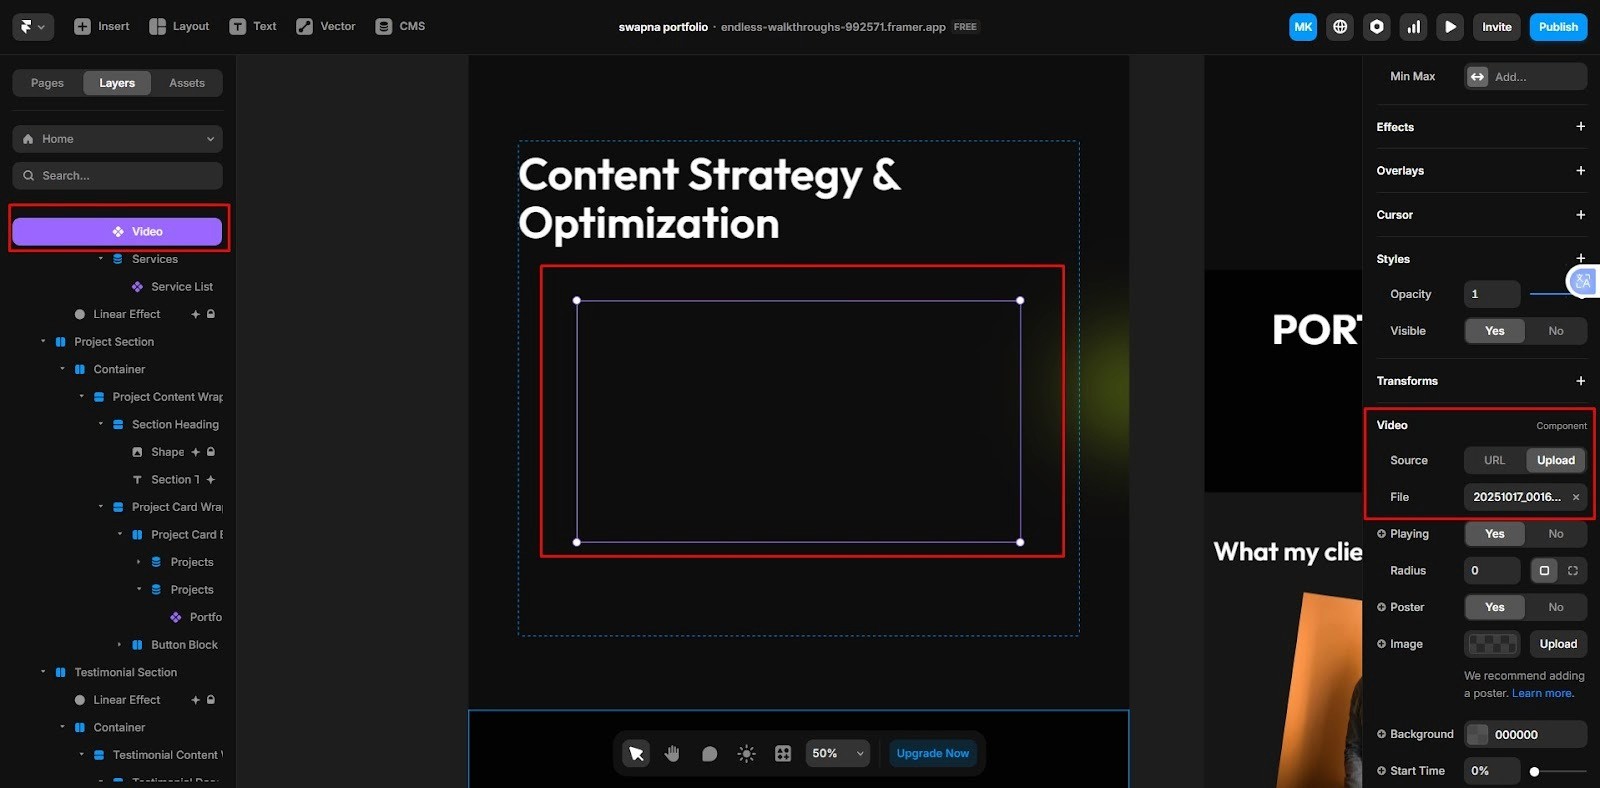
Step 2 - Set the Video Source (Upload or URL)
Framer allows two main ways to add your video:
Option 1: Upload from Your Computer
Select the video component.
In the right-hand sidebar under video, click upload and then choose file.
Pick your video from your computer.
Option 2: Use a Direct Video URL
Paste the URL of your video file in the video on the Source field, this link must connect you directly with the address of the video file like .mp4, .webm. Links to YouTube, Vimeo watch pages won’t work here.
Press Enter, and the video should load into the component.
Option 3: YouTube/Vimeo Videos
When the video is hosted on YouTube or Vimeo, use Framer's special YouTube / Vimeo components to replace the video component.
Pro Tips:
If you put your videos on a service that provides direct file URLs, such as your own server, S3 with public access, or a CDN, cloud storage links that don't directly point to the file need no lie in search results.
Step 3 - Configure Playback Settings
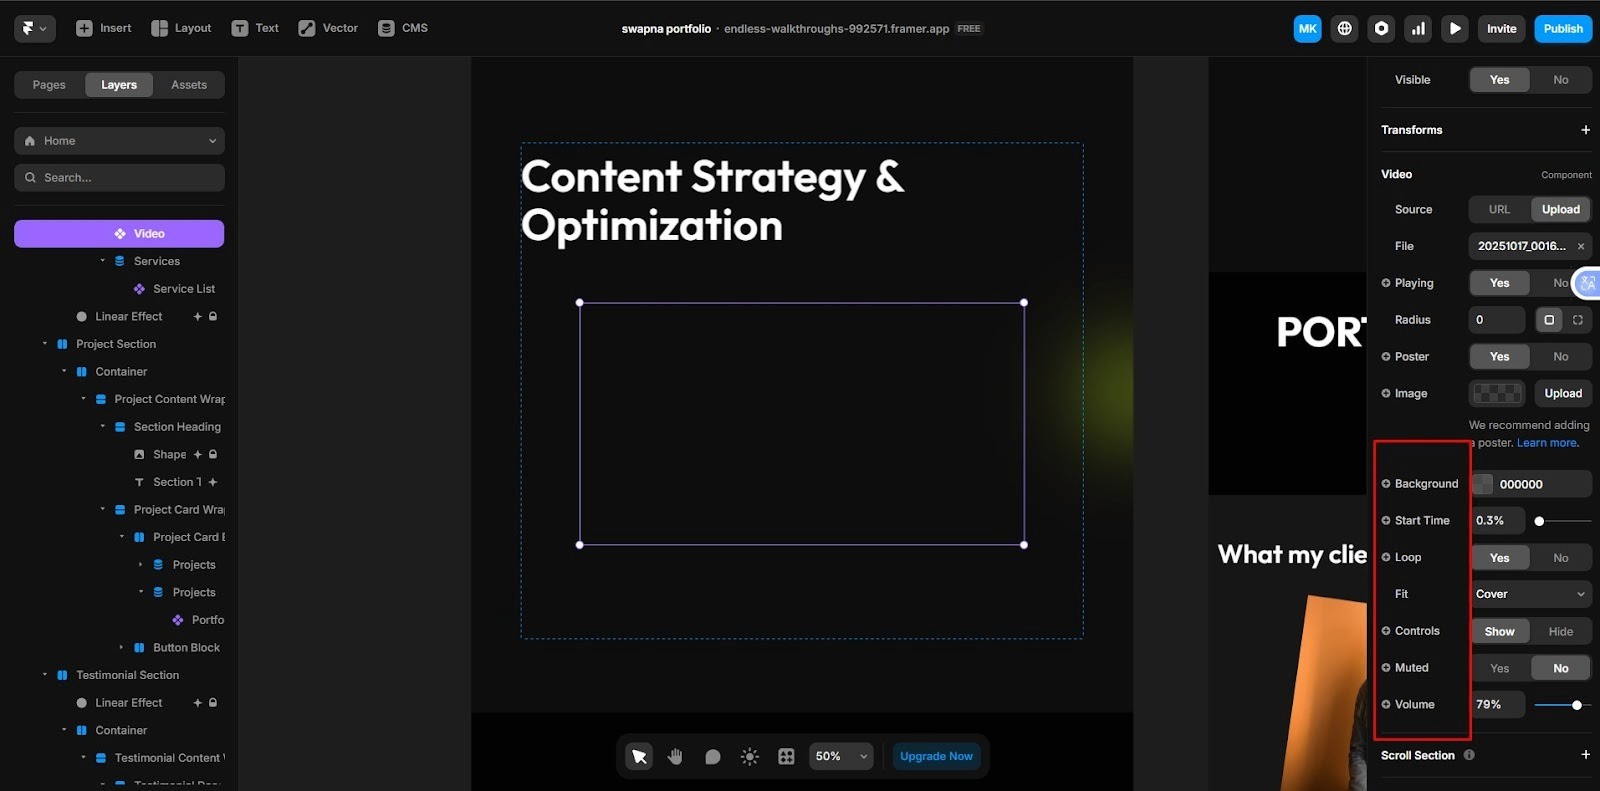
Once the video is set up for playback, you can adjust playback behavior:
Autoplay: The video will play automatically when the page loads. Many browsers restrict autoplay with sound, so consider enabling Muted if you want autoplay to work.
Controls: Choose whether to show playback controls play/pause, scrub bar, volume, playback speed, and picture-in-picture.
Muted/Volume: Mute the video as required or work out its volume.
Loop: Enable looping for repeating videos or animated backgrounds.
Start Time: Specify where the video should begin playback.
Pro Tips:
For subtle motion or decorative backgrounds, looping muted videos work best without distracting the user.
Step 4 - Customize Visual Settings
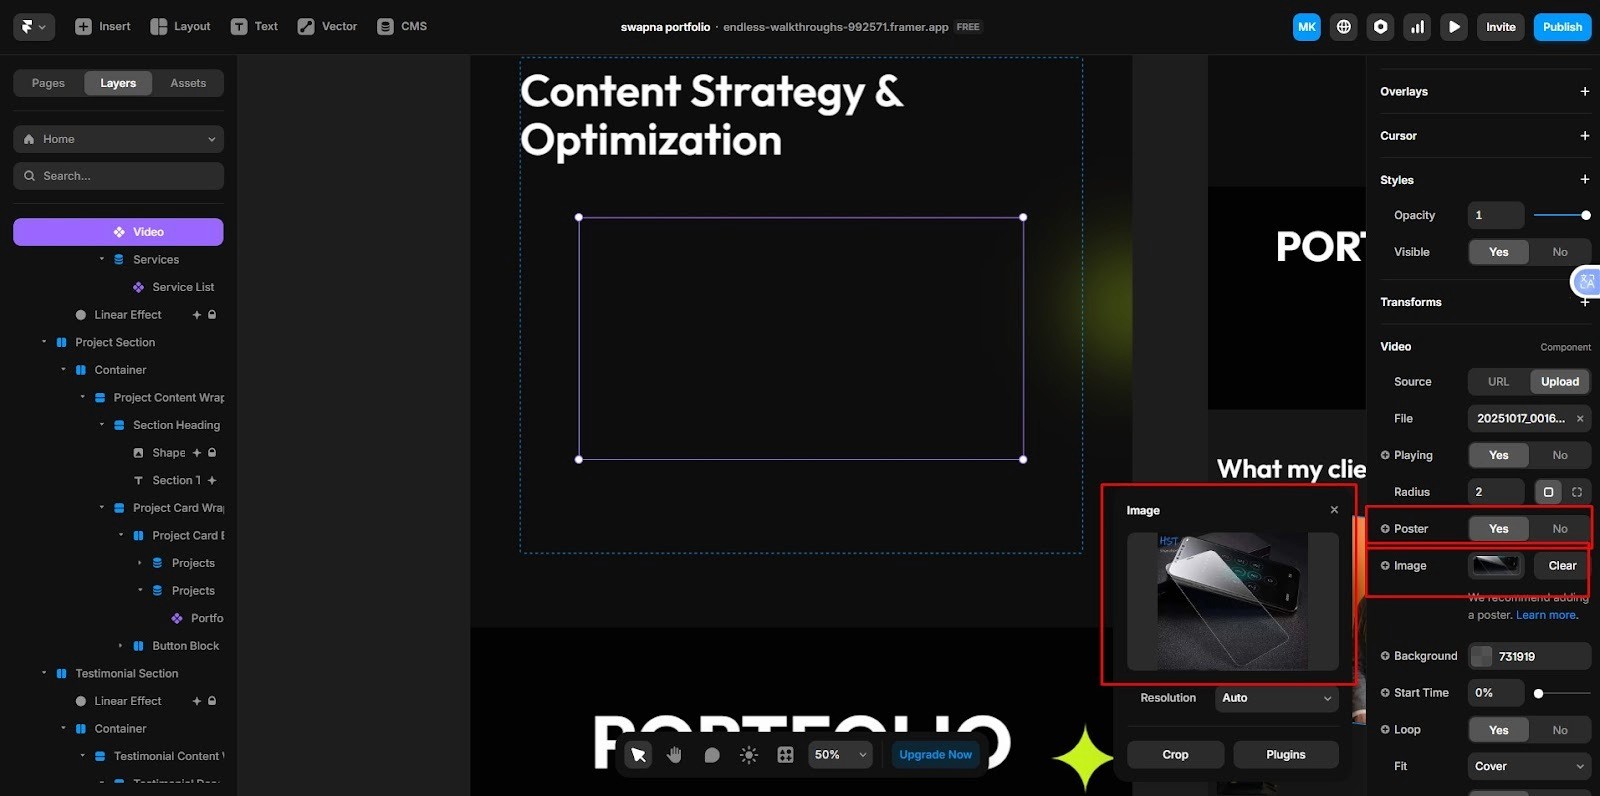
Framer lets you style your video visually to match your site’s design:
Poster /Thumbnail: Upload an image that shows before the video plays. This improves perceived performance and gives context.
Background: Set a background color if your video has transparency or empty spaces.
Corner Radius: Round corners globally or individually.
Step 5 - Choose the Right Fit Mode
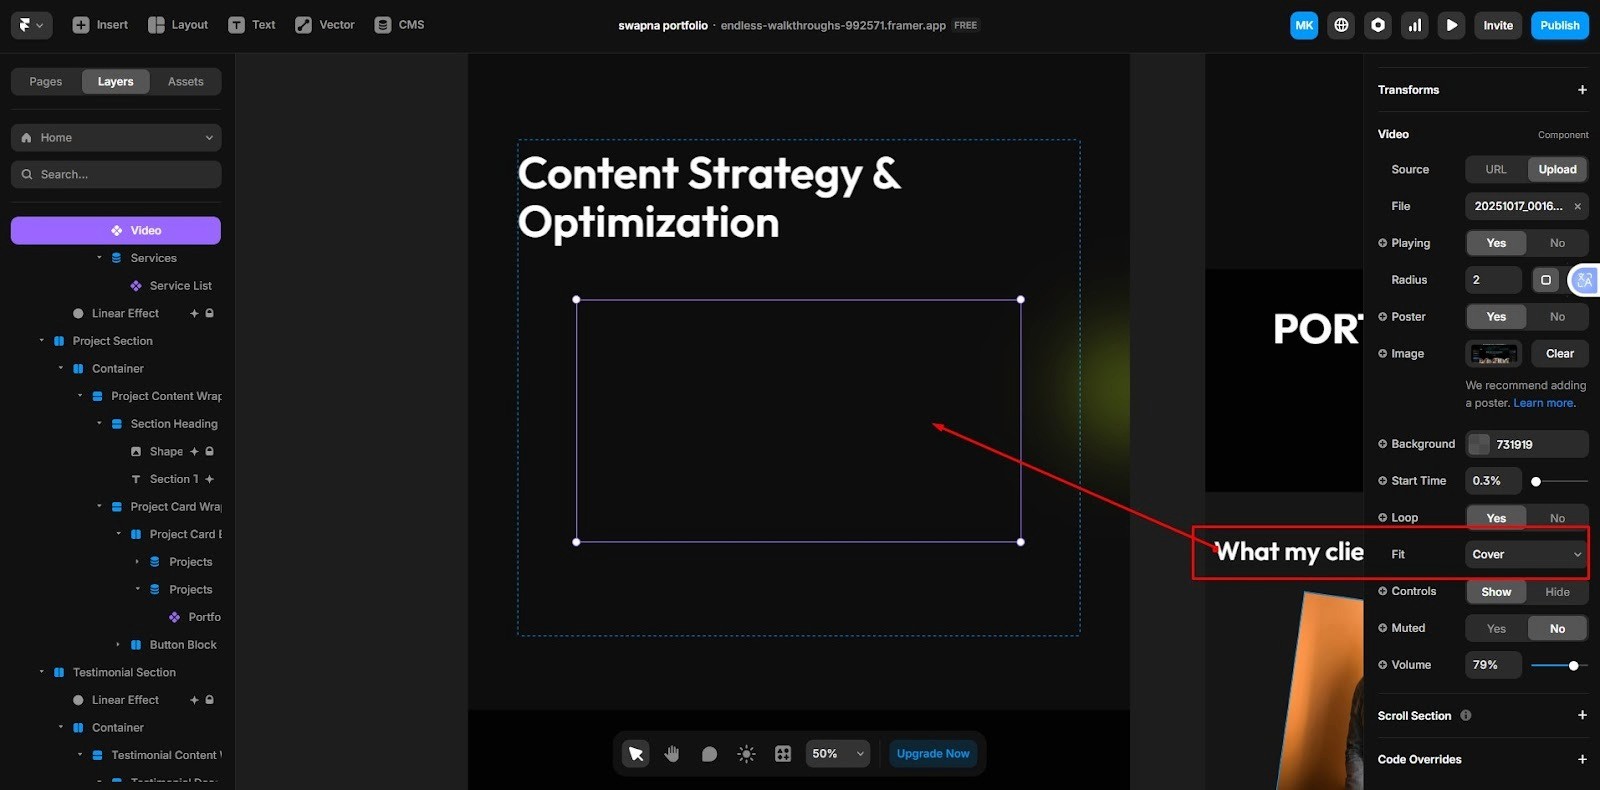
How your video fits its container matters for layout and design:
Cover: Fills the container while preserving aspect ratio; parts may be cropped.
Fill: Stretches to fill container dimensions; may distort aspect ratio.
Contain: Scales video to fit inside the container without cropping; letterboxing may appear.
Scale-down: Similar to contain, but only scales down; small videos won’t be enlarged.
Pro Tips:
Use Cover for full-screen backgrounds, Contain for embedded clips, and Scale-down when you don’t want small videos stretched.
Step 6 - Preview and Test Your Video
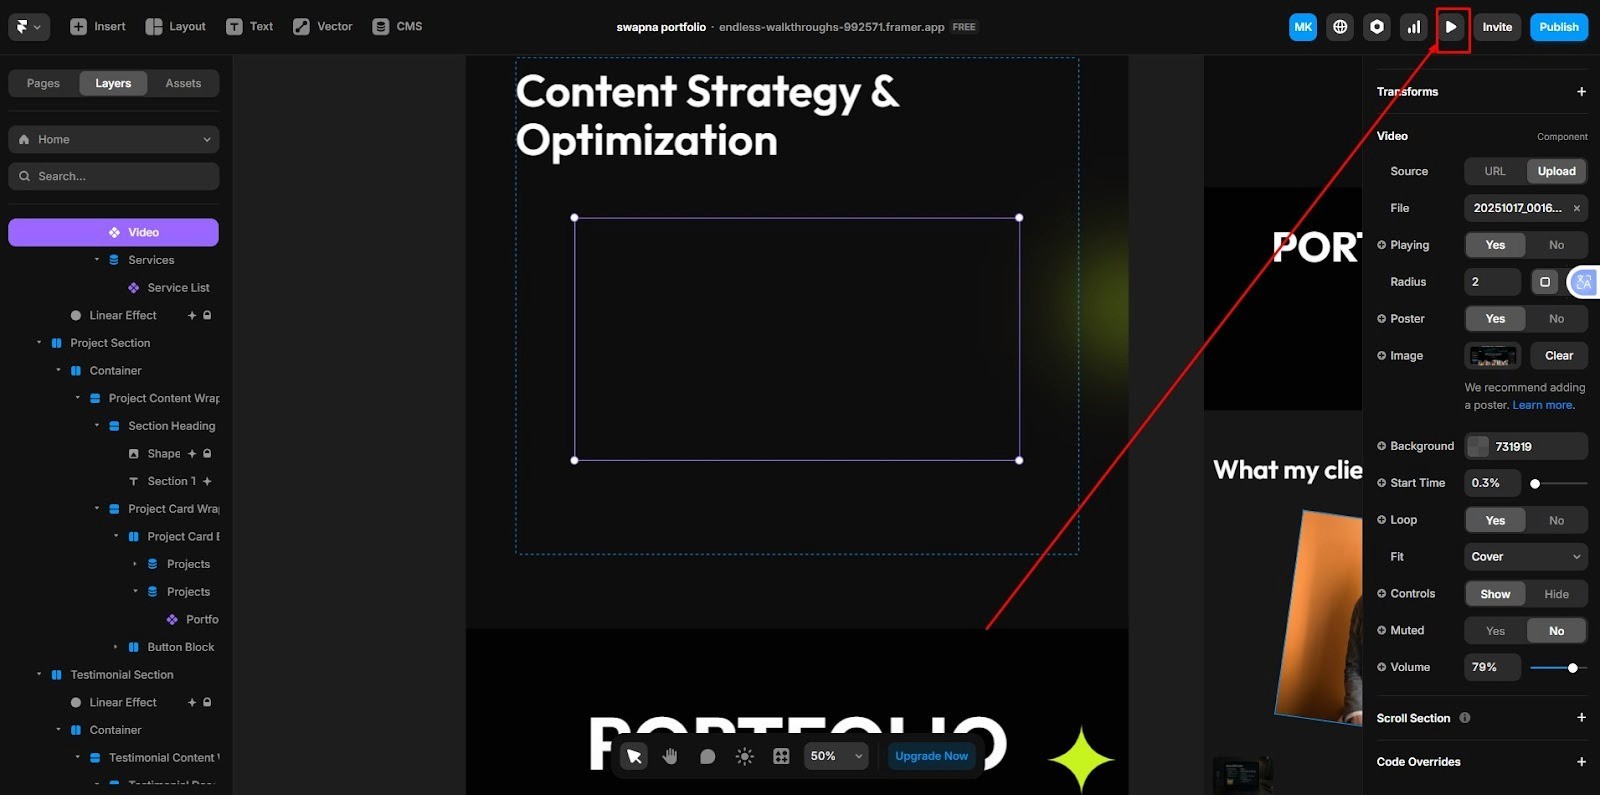
After setting everything up:
Click Preview in Framer to check video playback.
Ensure autoplay, loop, controls, and volume behave as expected.
Test on multiple browsers and devices for compatibility.
Step 7 - Optimize, Troubleshoot & Publish
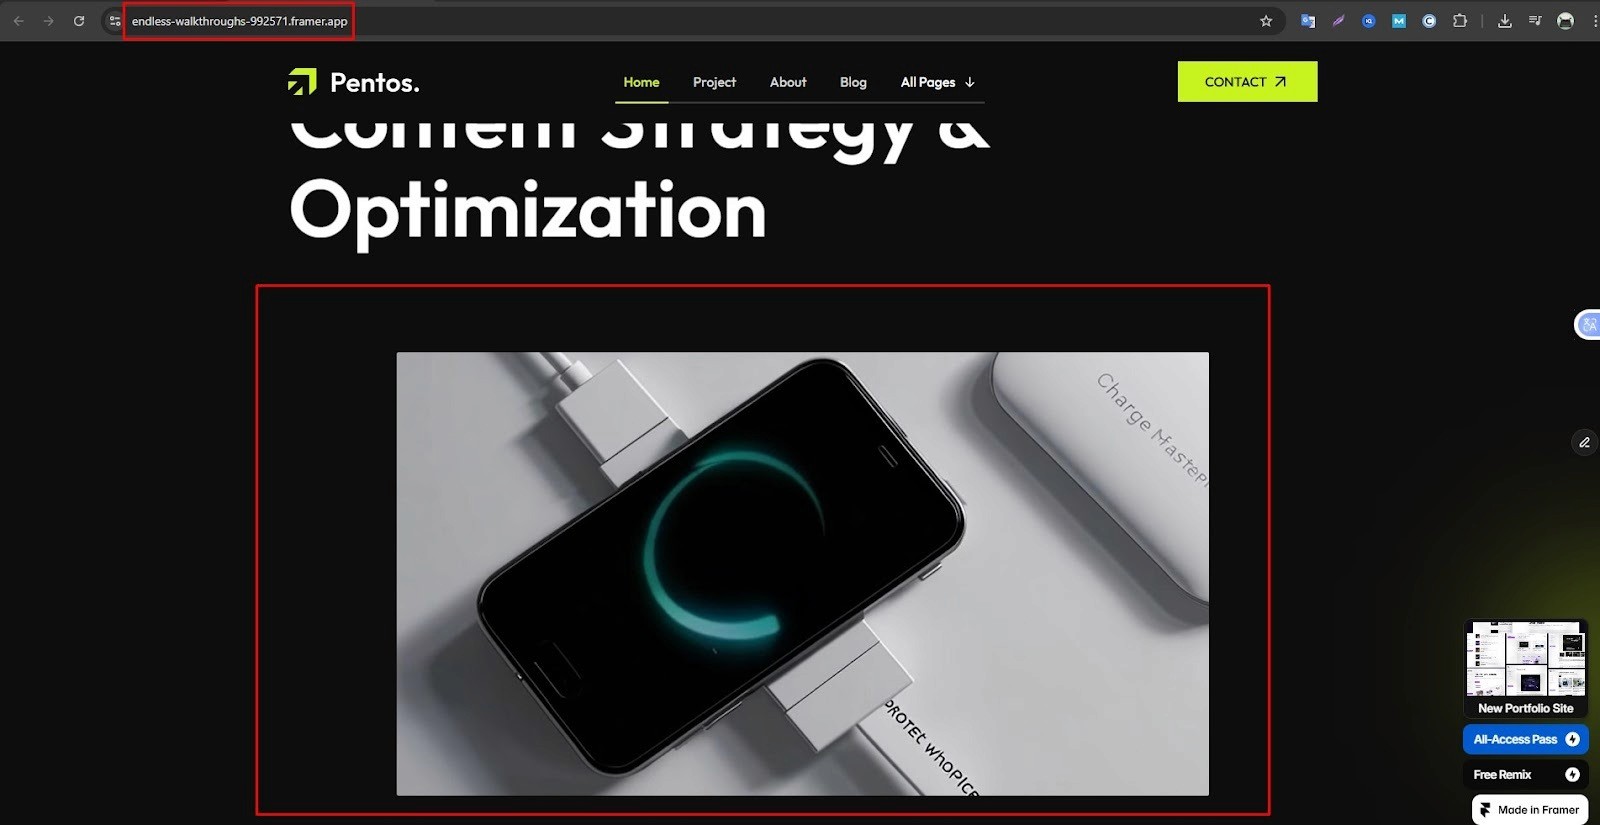
Before publishing, to ensure smooth video performance, check these steps:
Use H.264 MP4 for maximum browser compatibility.
Keep file sizes reasonable, compress videos for web use.
If the URL doesn’t work, verify it’s a direct video link ending in a supported extension.
Provide accessibility options like captions, transcripts, or alternative ways for users to access content.
Remember that autoplay with sound is blocked in many browsers; consider autoplay muted with an option for users to unmute.
And finally publish it.
Short Review for ''how to add video to framer template'':
Adding videos in Framer is fast and flexible with these steps:
Insert → Media → Video, place and resize.
Set the source via upload or direct URL.
Select the playback options: autoplay, loop, controls, muted, and start time.
Customize visual settings: poster, background, corners.
For layout and design, choose the most appropriate display mode.
Preview, test, and optimize for performance and accessibility. If everything is okay, you can publish it.
With these few steps, turning your Framer videos into ones that are professional will be a fait accompli. They'll load fast and enhance user experience as well, for the best results. If you’ve been worried about putting some sizzle into your business, now is the perfect time to make Videos for Business.
Conclusion
And that’s it, now you know how to add a video to your Framer site. Just follow the steps above and you'll make your pages more dynamic. Whether you're uploading a video or need to add a link, tweak the playback settings, and adapt the layout until it feels right for everyone watching, of course!
After all, at Framerbite we believe letting our creators try, try, and succeed, anything goes in the quest for style that suits you. So remember to always make your videos as small as possible but still look good on every device, even if they load a little slower.
Now it's your turn, go to your Framer project and try it out. We can't wait to see what you come up with. For Free Framer template customization, Browse Framerbite Free Framer Templates that Make Websites Look Premium.
5 Important Queries for Adding Video on the Framer Website
1. How can I add a video in Framer?
Adding a video in Framer, open your project and click Insert → Media → Video and bring the component to your page. Next, upload a video file or provide a direct URL to your video.
2. What exactly is the Framer video component and how does it work?
Framer Video Component is a component designed to help you add, style, and control videos on your website without the need for coding. You can do this via file upload, directly video’s link, or YouTube / Vimeo components for hosted videos.
3. How to embed a video in framer website?
To embed a video, you can simply paste the direct link to the video file in the source field of a video component. If your video is from YouTube/Vimeo, use YouTube/Vimeo components instead of the Video component. This allows seamless adding of the font to your website for full playback.
4. How can I autoplay and set a video to loop in Framer?
After open framer canvas, click on left corner Insert, toggle autoplay to have videos play automatically and Loop to watch them on repeat. In order for autoplay to work seamlessly, don’t forget to mute the video because most browsers prevent videos with sound from autoplaying.
5. What’s the best way to upload and optimize videos for Framer websites?
Use formats with high compatibility and fast loading time, such as compressed video formats like MP4. Optimize for a small file size less than 10MB if possible and host the videos on a fast CDN or storage service with direct file access. Adding a poster image will also increase performance and the user’s experience during video load times.
Hey Designers, we’re the Framerbite team, and we know adding a video to your Framer website can feel a little confusing at the beginning. But don't worry, it's actually super easy, once you know where to click.
A video can make your site look more active and more fun, even if it's a short product clip, a looping background, or some simple animation. The process of adding a video in Framer, we will guide you through each step step-by-step, from uploading your file to using a video link, setting the size and quality of playback, and layout.
Just follow the instructions in the step-by-step, and by the time you finish, you'll be running a stunning video without any bugs for your Framer template, no configuration or programming needed.
What You’ll Need Before Starting,
Make sure you have:
A Framer project is open and editable
A video file, uploaded from your computer or hosted on a direct URL supporting video formats
Basic familiarity with Framer’s Insert Menu and the right-hand properties panel
Step 1 - Open Canvas and Insert the Video Component
Adding videos to your Framer template is not necessarily as difficult as you might think. This guide will show you how to get the job done, along with installing video files and optimizing the user experience. Your videos will be displayed correctly while diverting people’s attention to their content. Still, the process engages your learners in high levels of concentration just as well or better than when they were asked to watch a moving picture.
Adding a video in Framer is simple with these steps:
Open your project in Framer.
Click Insert in the top-left corner.
Scroll down to the Media section and select Video.
Drag the Video component into your layout and place it wherever you want it under a heading, in a section, or as a background.
You can also drop it to scale or resize in video view, hold Shift + Option while resizing to maintain proportions, and center the video more easily.
Quick Tips:
You can also use videos as looping animated backgrounds; just put those video clips out of sight (behind other elements) and then check the loop in the Video panel.
Step 2 - Set the Video Source (Upload or URL)
Framer allows two main ways to add your video:
Option 1: Upload from Your Computer
Select the video component.
In the right-hand sidebar under video, click upload and then choose file.
Pick your video from your computer.
Option 2: Use a Direct Video URL
Paste the URL of your video file in the video on the Source field, this link must connect you directly with the address of the video file like .mp4, .webm. Links to YouTube, Vimeo watch pages won’t work here.
Press Enter, and the video should load into the component.
Option 3: YouTube/Vimeo Videos
When the video is hosted on YouTube or Vimeo, use Framer's special YouTube / Vimeo components to replace the video component.
Pro Tips:
If you put your videos on a service that provides direct file URLs, such as your own server, S3 with public access, or a CDN, cloud storage links that don't directly point to the file need no lie in search results.
Step 3 - Configure Playback Settings
Once the video is set up for playback, you can adjust playback behavior:
Autoplay: The video will play automatically when the page loads. Many browsers restrict autoplay with sound, so consider enabling Muted if you want autoplay to work.
Controls: Choose whether to show playback controls play/pause, scrub bar, volume, playback speed, and picture-in-picture.
Muted/Volume: Mute the video as required or work out its volume.
Loop: Enable looping for repeating videos or animated backgrounds.
Start Time: Specify where the video should begin playback.
Pro Tips:
For subtle motion or decorative backgrounds, looping muted videos work best without distracting the user.
Step 4 - Customize Visual Settings
Framer lets you style your video visually to match your site’s design:
Poster /Thumbnail: Upload an image that shows before the video plays. This improves perceived performance and gives context.
Background: Set a background color if your video has transparency or empty spaces.
Corner Radius: Round corners globally or individually.
Step 5 - Choose the Right Fit Mode
How your video fits its container matters for layout and design:
Cover: Fills the container while preserving aspect ratio; parts may be cropped.
Fill: Stretches to fill container dimensions; may distort aspect ratio.
Contain: Scales video to fit inside the container without cropping; letterboxing may appear.
Scale-down: Similar to contain, but only scales down; small videos won’t be enlarged.
Pro Tips:
Use Cover for full-screen backgrounds, Contain for embedded clips, and Scale-down when you don’t want small videos stretched.
Step 6 - Preview and Test Your Video
After setting everything up:
Click Preview in Framer to check video playback.
Ensure autoplay, loop, controls, and volume behave as expected.
Test on multiple browsers and devices for compatibility.
Step 7 - Optimize, Troubleshoot & Publish
Before publishing, to ensure smooth video performance, check these steps:
Use H.264 MP4 for maximum browser compatibility.
Keep file sizes reasonable, compress videos for web use.
If the URL doesn’t work, verify it’s a direct video link ending in a supported extension.
Provide accessibility options like captions, transcripts, or alternative ways for users to access content.
Remember that autoplay with sound is blocked in many browsers; consider autoplay muted with an option for users to unmute.
And finally publish it.
Short Review for ''how to add video to framer template'':
Adding videos in Framer is fast and flexible with these steps:
Insert → Media → Video, place and resize.
Set the source via upload or direct URL.
Select the playback options: autoplay, loop, controls, muted, and start time.
Customize visual settings: poster, background, corners.
For layout and design, choose the most appropriate display mode.
Preview, test, and optimize for performance and accessibility. If everything is okay, you can publish it.
With these few steps, turning your Framer videos into ones that are professional will be a fait accompli. They'll load fast and enhance user experience as well, for the best results. If you’ve been worried about putting some sizzle into your business, now is the perfect time to make Videos for Business.
Conclusion
And that’s it, now you know how to add a video to your Framer site. Just follow the steps above and you'll make your pages more dynamic. Whether you're uploading a video or need to add a link, tweak the playback settings, and adapt the layout until it feels right for everyone watching, of course!
After all, at Framerbite we believe letting our creators try, try, and succeed, anything goes in the quest for style that suits you. So remember to always make your videos as small as possible but still look good on every device, even if they load a little slower.
Now it's your turn, go to your Framer project and try it out. We can't wait to see what you come up with. For Free Framer template customization, Browse Framerbite Free Framer Templates that Make Websites Look Premium.
5 Important Queries for Adding Video on the Framer Website
1. How can I add a video in Framer?
Adding a video in Framer, open your project and click Insert → Media → Video and bring the component to your page. Next, upload a video file or provide a direct URL to your video.
2. What exactly is the Framer video component and how does it work?
Framer Video Component is a component designed to help you add, style, and control videos on your website without the need for coding. You can do this via file upload, directly video’s link, or YouTube / Vimeo components for hosted videos.
3. How to embed a video in framer website?
To embed a video, you can simply paste the direct link to the video file in the source field of a video component. If your video is from YouTube/Vimeo, use YouTube/Vimeo components instead of the Video component. This allows seamless adding of the font to your website for full playback.
4. How can I autoplay and set a video to loop in Framer?
After open framer canvas, click on left corner Insert, toggle autoplay to have videos play automatically and Loop to watch them on repeat. In order for autoplay to work seamlessly, don’t forget to mute the video because most browsers prevent videos with sound from autoplaying.
5. What’s the best way to upload and optimize videos for Framer websites?
Use formats with high compatibility and fast loading time, such as compressed video formats like MP4. Optimize for a small file size less than 10MB if possible and host the videos on a fast CDN or storage service with direct file access. Adding a poster image will also increase performance and the user’s experience during video load times.


Read more articles

Feb 28, 2026
Best Framer Templates with Parallax Scrolling
Feb 28, 2026
Best Framer Templates with Parallax Scrolling

Feb 22, 2026
Framer Canvas: Design Without Limits
Feb 22, 2026
Framer Canvas: Design Without Limits

Feb 19, 2026
Best Companies Specializing in Framer Website Templates in 2026
Feb 19, 2026
Best Companies Specializing in Framer Website Templates in 2026
Find perfect template for your website & get 50% discount coupon

Templates
Copyright © 2026 FramerBite, A Part of Creetfy LLC. All Rights Reserved
Follow us on Twitter
Find perfect template for your website & get 50% discount coupon
Templates
Copyright © 2026 FramerBite, A Part of Creetfy LLC. All Rights Reserved
Follow us on Twitter
Find perfect template for your website & get 50% discount coupon
Templates
Copyright © 2026 FramerBite, A Part of Creetfy LLC. All Rights Reserved
Follow us on Twitter
Find perfect template for your website & get 50% discount coupon
Templates
Copyright © 2026 FramerBite, A Part of Creetfy LLC. All Rights Reserved
Follow us on Twitter